

A few useful things to know about wood:
Types and varieties.
Planning what you need.
Purchasing it.
Working with it.
Types and varieties.
Planning what you need.
Purchasing it.
Working with it.
Types and varieties:
The internet is awash with excellent pages on the different kinds of lumber available for the woodworker / crafts-person. For example, if you're interested in learning about the (admittedly interesting) grain patterns of Central American Zebrawood - go ahead and look it up. However, if you're interested in a more general discussion of wood types, keep reading.
There are two classifications of lumber products; solid wood and manufactured wood. Manufactured wood is artificial and can consist of all sorts of materials: sawdust, glues, wood chips, random chemicals, etc. An example that most everyone has heard of is plywood. Plywood consists of a number of thin layers ('veneers') pressed together with glues - typical forming a sheet (such as, the common 4' by 8' sheet of plywood). We're going to primarily discuss solid wood. Solid wood is just what it sounds like - a solid piece of a tree (simplification, yes - but let's move on, shall we?).
There are two classifications of solid wood; hardwoods and softwoods. Softwoods typically come from evergreen conifers such and pine, fir, spruce, cedar, etc. Hardwoods typically come from broad-leaved trees such as oak, maple, walnut, teak, etc. It is generally true that hardwoods are harder than softwoods, but that is not always the case. For example, Balsa wood is classified as a hardwood, but in reality is very soft (ask anyone who built models when they were young). Softwoods are often used in construction (i.e., the 2" by 4" pine studs inside your walls), and are also commonly used for woodworking. I often work with pine for a number of reasons:
- Inexpensive. This is, of course, a relative term. As with most things, you get what you pay for, and you can pay quite a bit for nice softwoods. More about this in the 'Purchasing it' section below...
- Easy to find. Unlike the somewhat rare Central American Zebrawood, finding pine to use for projects is as simple as a trip to any home improvement store (i.e., Lowes, Home Depot, etc.), or local lumber yard. Sometimes, it is even easier than that. You might find a stack of trash 1" by 12" boards in some alley that someone is getting rid of - boards that can be cleaned up and used for all sorts of projects. This is called 'reclaimed' or 'recycled' lumber. Please be careful if you're going to drive down random alleys looking for lumber! ;)
- Easy (sort of) to work with. Pine is a soft wood, and as such is very forgiving on tools - sandpaper, saw blades, etc. Unfortunately, the softness also makes it easy to damage the surface of the lumber. The tools can leave marks on it, or bumping a piece into a wall can dent it.
- Finishes well. Pine is easy to sand to a nice clean finish, then coat with stain or oils or varnish or (*shudder*) paint. My personal preference is to highlight the natural grains and shapes in the wood with stain and then a clear varnish. Varnish can add some needed protection to the relatively soft material, as well as look nice. More on finishes in the 'Working with it' section below...
Hardwoods are also commonly used for woodworking. Many hardwoods are considered exotics (remember the Central American Zebrawood?) and look very striking when worked into a nice piece of furniture or other project. More common hardwoods, like oak, can typically be found alongside the pine at home improvement stores - although they are usually more expensive. The more exotic hardwoods can be difficult to find except at lumber yards (or woodworking stores) that specialize in carrying such things. Some hardwoods can even be bought from online lumber yards and shipped to you (I've gotten many an order of red oak and maple from Bell Forest Products over the years). Hardwoods can be more difficult to work with and tougher on tools, but they usually finish very well - often better then their softwood counterparts.
A quick note on safety. Some exotic woods are rather toxic. The dust from working with them can cause health problems, and if you are planning to build a cutting board, or kitchen counter-top, or anything that might contact food, do your research and don't use a lumber that will literally poison you. You're pretty safe sticking with common materials from home improvement stores (pine, fir, oak, etc) - but it's important to do you research!
A quick note on safety. Some exotic woods are rather toxic. The dust from working with them can cause health problems, and if you are planning to build a cutting board, or kitchen counter-top, or anything that might contact food, do your research and don't use a lumber that will literally poison you. You're pretty safe sticking with common materials from home improvement stores (pine, fir, oak, etc) - but it's important to do you research!
Planning what you need:
While it would be fun to go out and simply purchase great quantities of lumber (*mouth watering slightly*), it is probably a better idea to have a specific plan of what you need.
Lumber fills up space surprisingly quickly, and you'll need a place to store it before you can use it. With that in mind, lumber absorbs moisture from the air fairly well (depending on the variety), and it will need to be in a dry place before being used. Lumber from the home improvement store is going to be kiln dried - so the moisture level should be pretty low to start with. But if you bring it home and store it in a wet environment, it will quickly absorb moisture and start to twist and warp. This is very bad if you plan to use it for crafts, or anything more useful then a cozy bonfire in the backyard.
Assuming you have a project in mind - with dimensions and a good idea of how it is going to go together - then part of planning the lumber purchase list for that project has to include some thought on the sizes of typical pieces of material. Unfortunately, lumber dimensions can be a little confusing.... (Pardon me while I go pour myself a drink.)
(Ok, I'm back.) So, while wandering about the home improvement store, you might notice a lumber rack labeled with the designation: 2" by 4" by 8' (that's 2 inches by 4 inches by 8 feet - also written as 2"x4"x8'). A couple more labels might read: 1" by 12" by 12' (1"x12"x12') , 4" by 4" by 10' (4"x4"x10'), etc. Alas! All is not as it seems. For various reasons, industry standard says a 2" by 4" is not actually 2" wide by 4" long. It is actually 1.5" wide by 3.5" long. The 'Actual' (or 'True') dimension (1.5" by 3.5") versus 'Nominal' dimension (2" by 4"). Thankfully, the height measurement is usually what it says it is - so the 8' in our example is actually 8'.
Thus, our examples would be:
2"x4"x8' (Nominal) --> 1.5"x3.5"x8' (True)
1"x12"x12' (Nominal) --> 0.75"x11.25"x12' (True)
2"x4"x8' (Nominal) --> 1.5"x3.5"x8' (True)
Here is a visual representation of a few other examples:
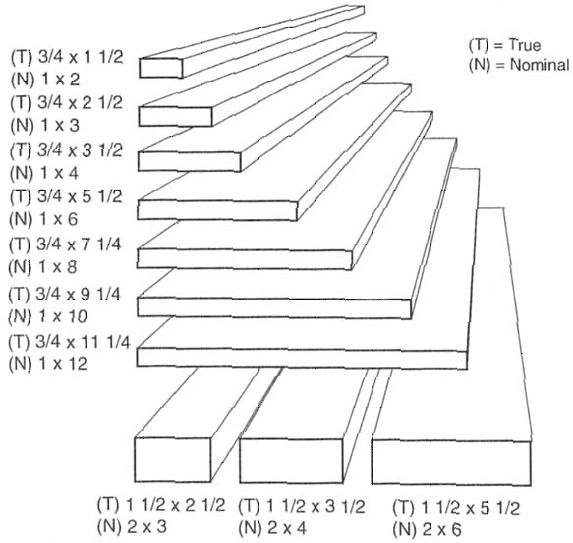
If you look at the examples closely, you'll notice there is some variation to the pattern - so it is always a good idea to have a tape measure (or smartphone with which to look stuff up) handy when browsing lumber. Many home improvement stores helpfully display the 'actual' dimension along with the 'nominal' dimension.
There is nothing more frustrating then purchasing a bunch of lumber for a project, getting it all to your workshop, starting to cut it up into the proper sizes... and realizing you don't have enough - or realizing you need a slightly different width of board for your plans to work properly. Always better to buy more then you need. You can always use it for a future project!
There is nothing more frustrating then purchasing a bunch of lumber for a project, getting it all to your workshop, starting to cut it up into the proper sizes... and realizing you don't have enough - or realizing you need a slightly different width of board for your plans to work properly. Always better to buy more then you need. You can always use it for a future project!
Purchasing it:
We've already discussed size variations when looking for lumber - but quality is another important factor. Lumber is commonly graded into categories based the quality of the wood. Lumber is typically divided into two categories: select and common. Those categories have further breakdowns:
Select:
Grade A - free from defects (no knots, no grain blemishes, etc)
down to...
Grade D - a few defects and grain blemishes (still no knots, though)
Common:
No. 1 - stable (small) knots, grain blemishes, defects
down to...
No. 5 - low quality, knots, grain splits, defects, large blemishes (in other words - Crap)
As you can guess, the higher in quality a piece of lumber, the more expensive it becomes. The highest and lowest grades are not typically found in the big home improvement stores - but often are at local lumber yards.
The project often dictates the quality of lumber needed. For example, if I'm building a nice wooden fireplace mantel - and it is going to be stained and varnished (thus showcasing the grain and quality of the lumber), I would want as nice a grade of lumber my budget would allow. However, it is often the case that I can use a lower quality lumber if I'm careful about choosing the pieces at the store. If a large board of pine has knots in it along one edge only - I may be able to use the other edge and get the cut I need without using the part of the board that contains the knot. Sometimes a project lends itself to showing the knots and blemishes (i.e., 'knotty pine') - it really just depends on the design.
Although not typically a huge problem at home improvement stores - it is good to watch out for lumber with splits, warps, twists, and other obvious problems which can occur at common or select grade levels. Most of the time simply looking at the length of lumber is enough to tell you if it has problems or not. It is always helpful to choose your lumber yourself (rather then putting in a blanket order) because you can pick exactly what you're getting.
Working with it:
This could be a post all it's own.
For now, I'm not going to get into the (exhaustive) details of actually cutting up and building with your hard-purchased lumber. You can't really learn how to use a table saw, miter saw, radial arm saw, etc., from reading about it - best to have someone teach you in person. I am, however, going to discuss some general tips.
We've already talked about lumber quality - and choosing the specific pieces you want from the store or lumber yard. It is impossible to purchase totally 'perfect' lumber - where all the edges are straight and none of the blemishes look bad (unless you're made of $$$). Therefore, consider your total material (and the list of pieces you know you need to cut from it), and plan ahead what pieces you're going to cut out of what full boards. This allows you to take those nasty lumber defects into account. If you simply start cutting without any plan at all, you'll end up running out of usable lumber, or having to glue sections together to get larger pieces (because you cut the smaller pieces up first - whoops). An early lumber layout of mine (I admit I rarely do this kind of detailed cutting layout anymore - but it was helpful when I was new to woodworking):
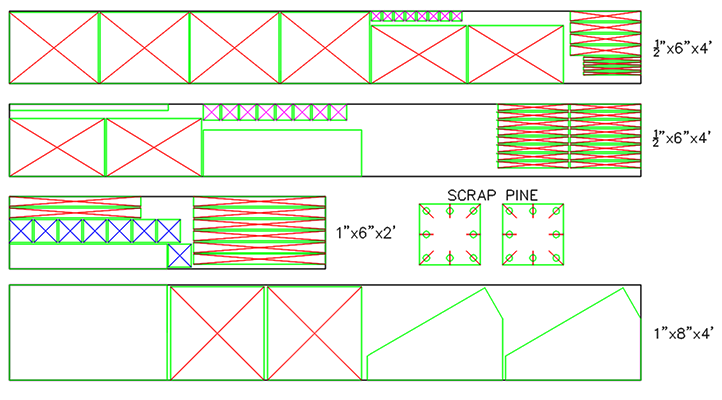
It is also helpful to label your pieces as you cut them up - especially if your project has tons of random sections. Be sure to label in pencil, though, so you can sand off any marks later. (If you use marker or pen, good luck - you're going to be in hell trying to sand that out.) ;)
Glue, nails, staples, screws, clamps, etc., also deserve their own post. Suffice it to say, you'll have to put that freshly cut lumber together somehow - hopefully in the general shape of the project you originally planned. Once assembled, the final part is the task of 'finishing' the lumber. When we say 'finishing' we're referring to protecting and beautifying the lumber. Often this includes hours and hours of sanding for a nice smooth surface before applying any finishing agents. There are a lot of ways to protect and beautify your wood (hehe): stains, varnishes, oils, etc. What you decide on will depend on what you want your project to look like. Most finishing compounds (i.e., stain) will 'bring out' the grain of the wood - making it more obvious and adding some color or tint to it. This can make a project look much nicer. Many finishing compounds (i.e., varnish) will also add a reflective sheen to the wood - acting as protection for the lumber as well as looking nice.
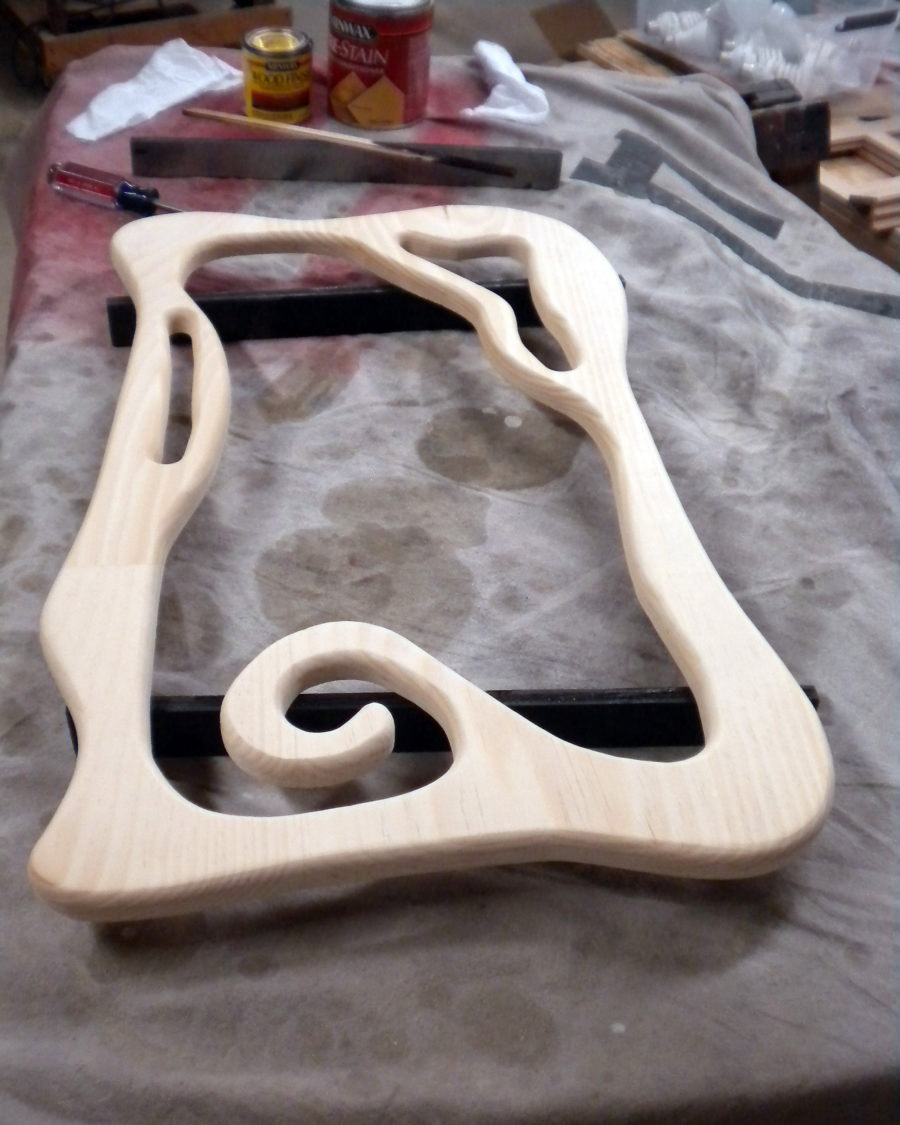
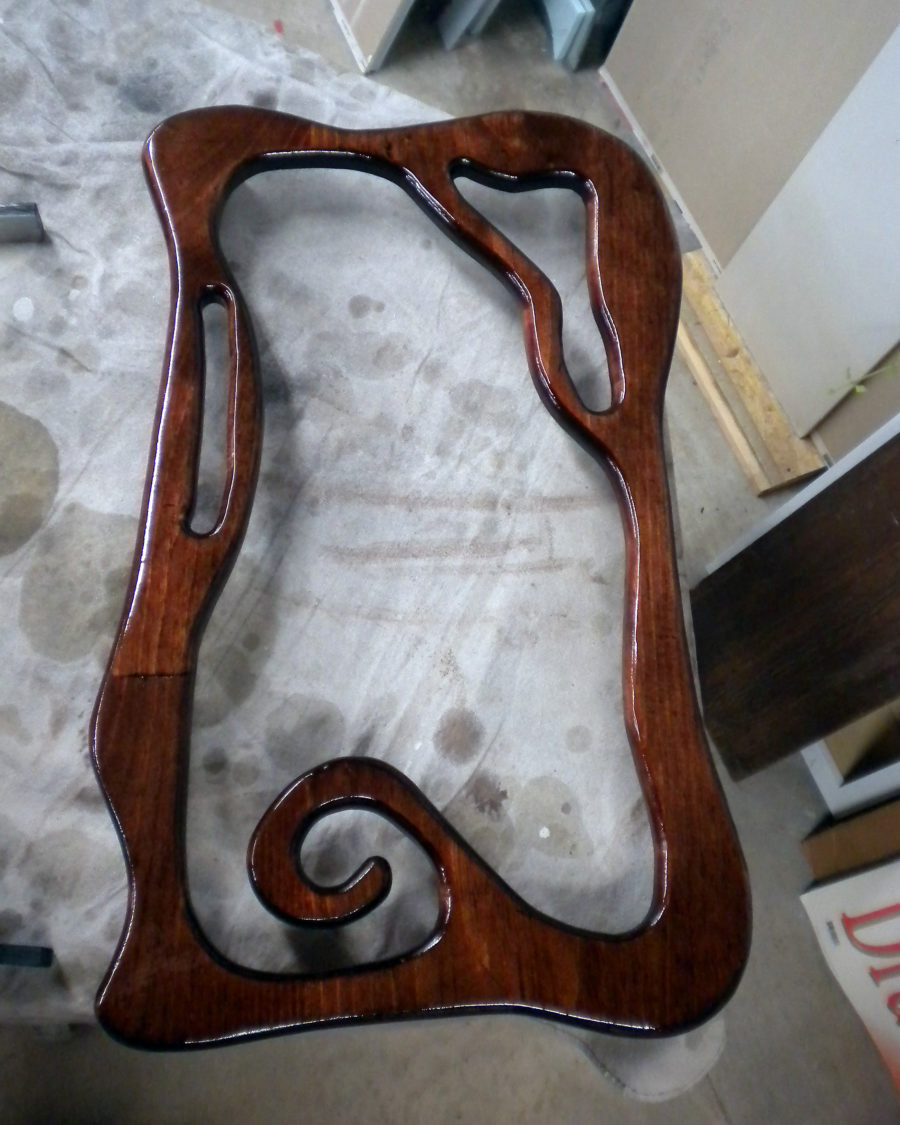
This is a Fairy Mirror I built. The photos show the piece (pine) without any finishing - and then with a couple of coats of stain (red oak stain) and varnish (polyurethane).
Glue, nails, staples, screws, clamps, etc., also deserve their own post. Suffice it to say, you'll have to put that freshly cut lumber together somehow - hopefully in the general shape of the project you originally planned. Once assembled, the final part is the task of 'finishing' the lumber. When we say 'finishing' we're referring to protecting and beautifying the lumber. Often this includes hours and hours of sanding for a nice smooth surface before applying any finishing agents. There are a lot of ways to protect and beautify your wood (hehe): stains, varnishes, oils, etc. What you decide on will depend on what you want your project to look like. Most finishing compounds (i.e., stain) will 'bring out' the grain of the wood - making it more obvious and adding some color or tint to it. This can make a project look much nicer. Many finishing compounds (i.e., varnish) will also add a reflective sheen to the wood - acting as protection for the lumber as well as looking nice.
This is a Fairy Mirror I built. The photos show the piece (pine) without any finishing - and then with a couple of coats of stain (red oak stain) and varnish (polyurethane).
Paint is another option. I rarely paint my projects, preferring to let the natural grain of the wood be seen. After all, I spent all that time and effort choosing the right pieces and cutting them up in a way that showed the natural lumber to its best advantage. However, I'll admit sometimes paint is necessary - and a well-built project that is painted can still look great.
Ok, now I can write posts about specific woodworking projects and refer to this post when discussing certain aspects of lumber. Yay!
Be safe - and pick out some nice lumber. :)
-Lia
Contact Me
My Writings (Transgender Woodworker content)
Artfully Functional (my studio)
LiaZero.com (all my online content)
My Writings (Transgender Woodworker content)
Artfully Functional (my studio)
LiaZero.com (all my online content)