
One of the purposes of this blog (see my list of goals), is to share past and current workshop project experiences and ideas. This of one of those kinds of blog entries.
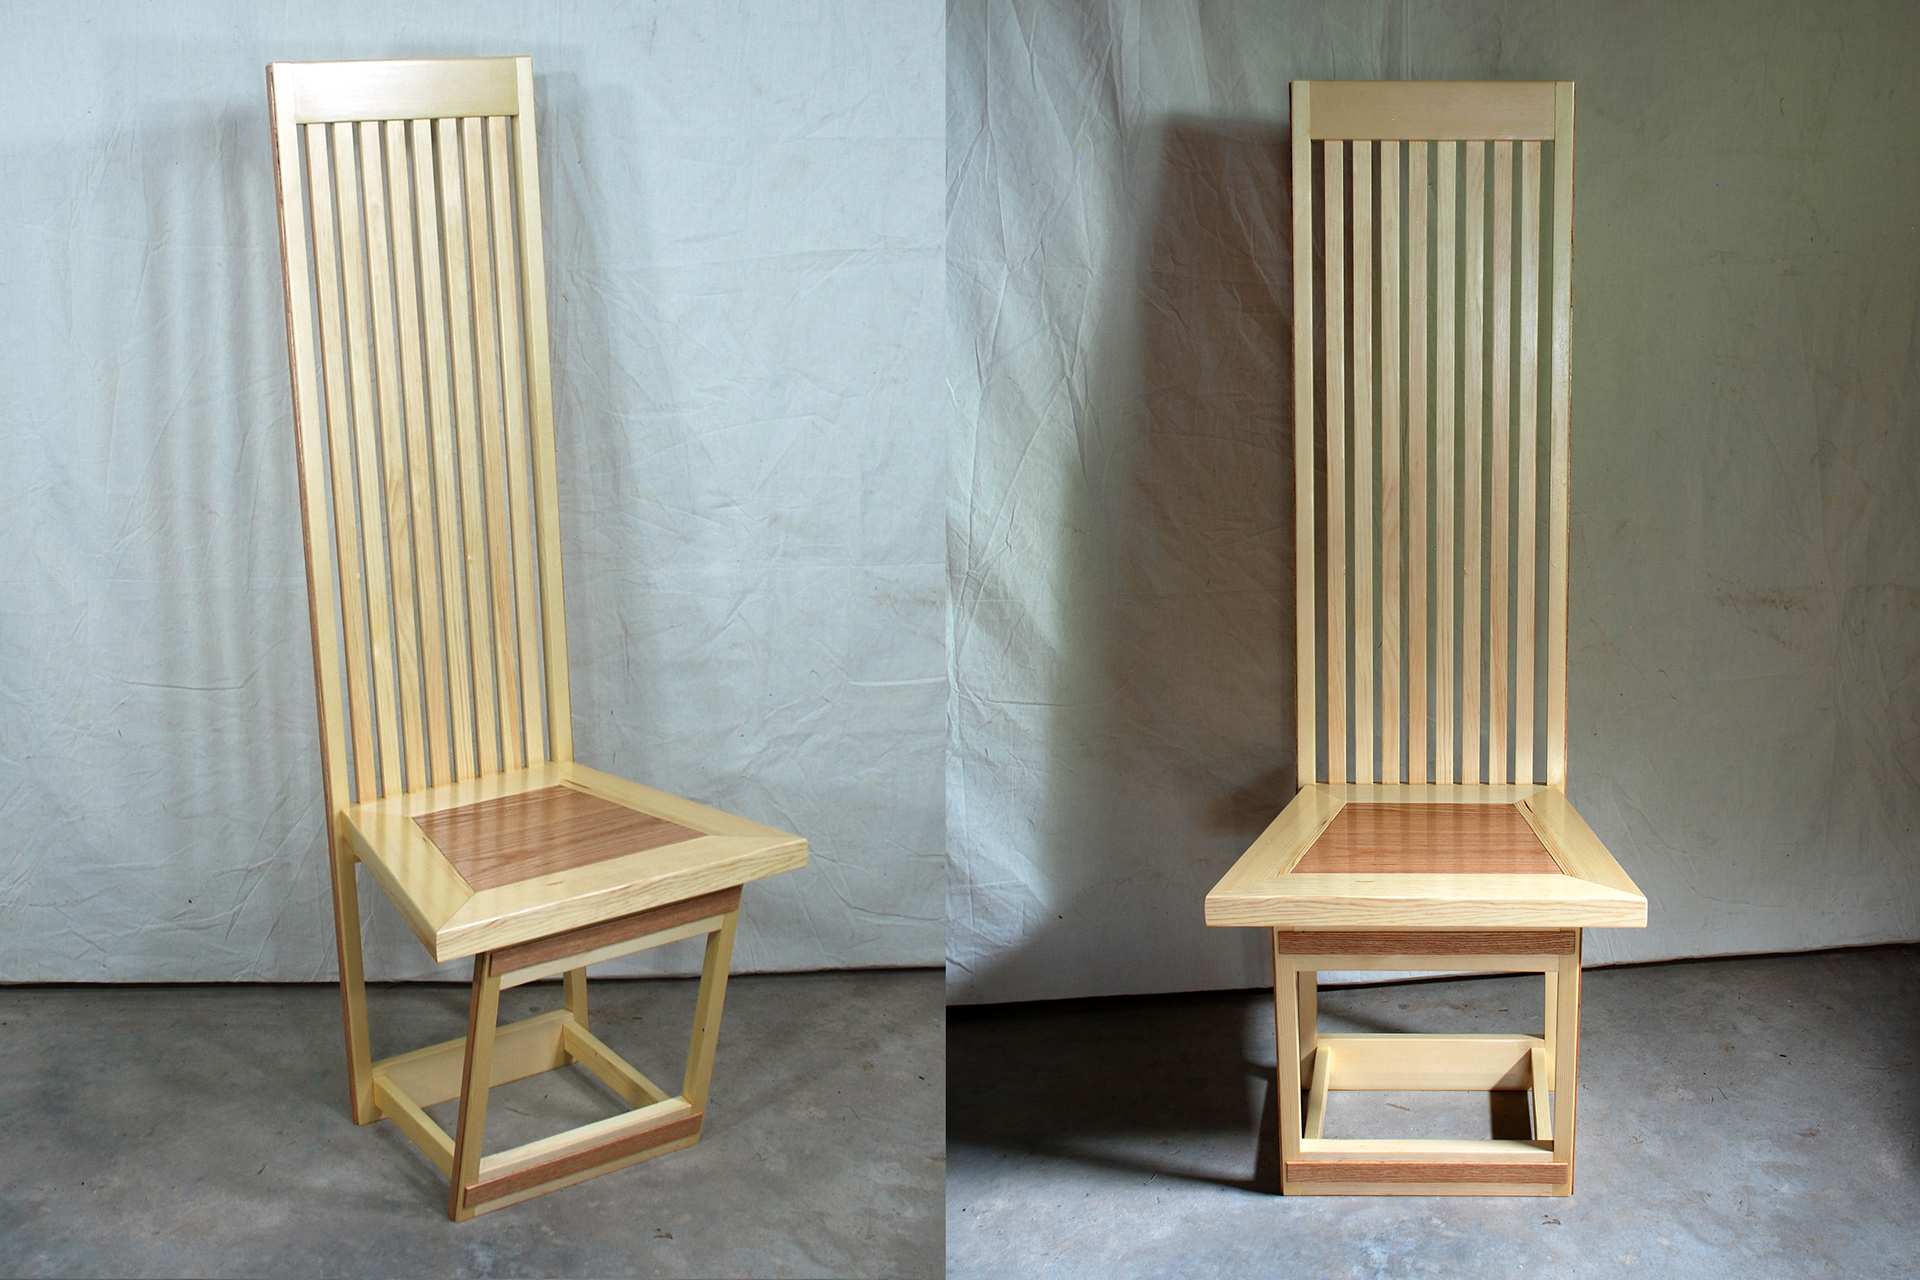
We'll be discussing designing/building the angled chair seen above - the official name for which is '8.5 Degree Chair'. The 8.5 degrees refers to the angle of the back (and front legs) of the chair to the floor (more about that later).
First, lets talk about the derriere! Also know as the fanny... or keister... or bum... rear... tail... rump... bottom... etc., etc. (ad nauseam). Everybody has one (much like opinions) and we all need somewhere to put them from time to time. We sit down for all kinds of activities, such as; working, eating, getting a haircut, flying on a plane, driving a car, and watching Netflix. We, as a society, spend so much time sitting that health institutions have been doing studies and trying to warn us. Also here. And here. The moral is, everyone should get up and move around more!
Are you sitting in a chair reading this blog? Go and take a walk! The dog needs to go out, and don't forget to pick up some milk and bread at the corner store. There's a storm coming and we have to have our milk and bread (for some reason)!
If, however, you're reading this blog entry while backpacking across the Serengeti carrying 60 lbs of gear in your backpack - then you're good. (In fact, find some shade and take a break - you're making me tired).
The point is, we spend a lot of time sitting - and one place we spend much of that time is in chairs. Sure, we can sit on other things; benches, car seats, logs, horses, rollercoasters, and whoopee cushions... But the chair will always be a classic go-to (and arguably, the whoopee cushion works better with a chair under it).
But what kind of chair? There are dining chairs, dressing chairs, office chairs, wing chairs, club chairs, folding chairs, rocking chairs, bar chairs, gaming chairs, deck chairs, armchairs, Adirondack chairs, beach chairs, kneeling chairs, bean-bag chairs, captain's chairs, fiddle-back chairs, high chairs, easy chairs, and - my least favorite - dentist chairs. That's all I could think of off the top of my head - but you get the idea. There is a lot of choice when it comes to where to set our collective butts.
Really, anyone can create their own chair. It could be simple - putting two milk crates together, or turning a five-gallon bucket upside down (both excellent when time and limited material demand). Or it could be more complex - something like this gilded 'Förgylld stol' circa 17th Century Sweden:
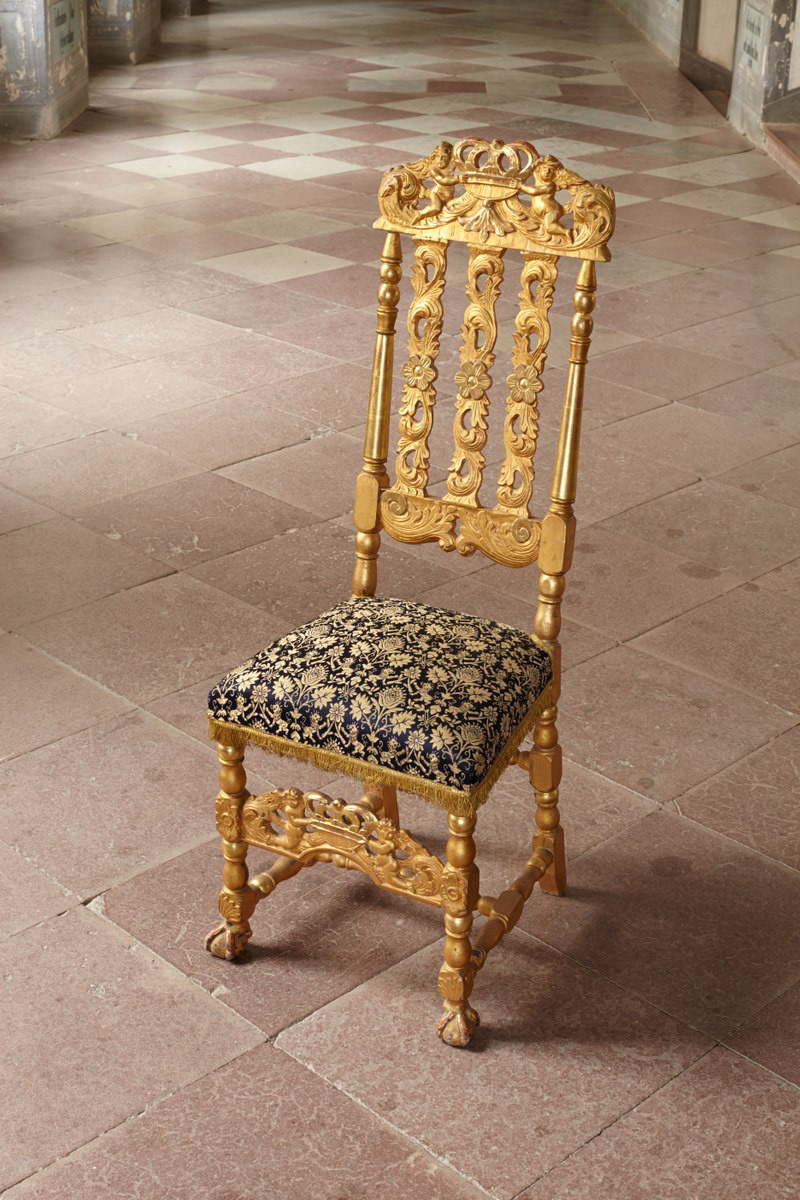
'Förgylld stol' - Skokloster Castle / Jenny Bergensten / CC BY-SA [CC BY-SA 3.0 (https://creativecommons.org/licenses/by-sa/3.0) or Public domain], via Wikimedia Commons
I'll admit - looking at that chair and thinking about all the hours that must have gone into crafting it makes me exhausted... So lets talk more about Design!
Design:
Everyone has their own style, constraints, skill set, etc... This project guide is intended, in a general sense, to give people ideas, and make them think about similar things they could design/build.
There are countless examples of chairs online and in the real world. What you want your chair to look like is entirely up to you, but it is always helpful to look around and find examples of what you like. You can use those examples as a basis for your own designs. I went through a ton of ideas and a number of previous chair builds before finalizing this specific design. For the chair in this example, I decided on a modern take on the traditional slat-back craftsman-style design (or, at least, that's what I tell people). The truth is, the design process can be very fluid - and the final design might have nothing to do with the initial idea. There is nothing wrong with changing your mind mid-design a few (or more) times. Designs often evolve into things we weren't expecting... And making all those design choices, and eventually ending up with a completed design that we can be happy with is the ultimate goal. As I wrote in another post - I like to practice 'industrial design' rather then 'crafts-based design'. Essentially, that means I like to have my design details figured out before construction begins.
If you're building a chair to fit inside a specific room - first you have to know for sure that the finished product will, in fact, fit. Not only physical fit, but also how the chair will look when considered against the other furnishings in the room. For example, how will your chair look next to the gilded Förgylld stol above? (On second thought - give the Förgylld stol its own room - it deserves it.)
For any project, it helps to have an idea of what you want the general final dimensions to be. This might be a good place to discuss standards!
Strictly speaking, standards are "published documents that establish specifications and procedures designed to ensure the reliability of the materials, products, methods, and/or services people use every day." In the case of my chair - I'm really only interested in what dimensions are safe / comfortable for a typical person. Thus, it's helpful to have a set of standard dimensions to keep in mind while going through the design & build process. Ernest Irving Freese (an oddly-humorous architect of the early 20th Century) created this useful 'Dimensions of the Human Figure' drawing:
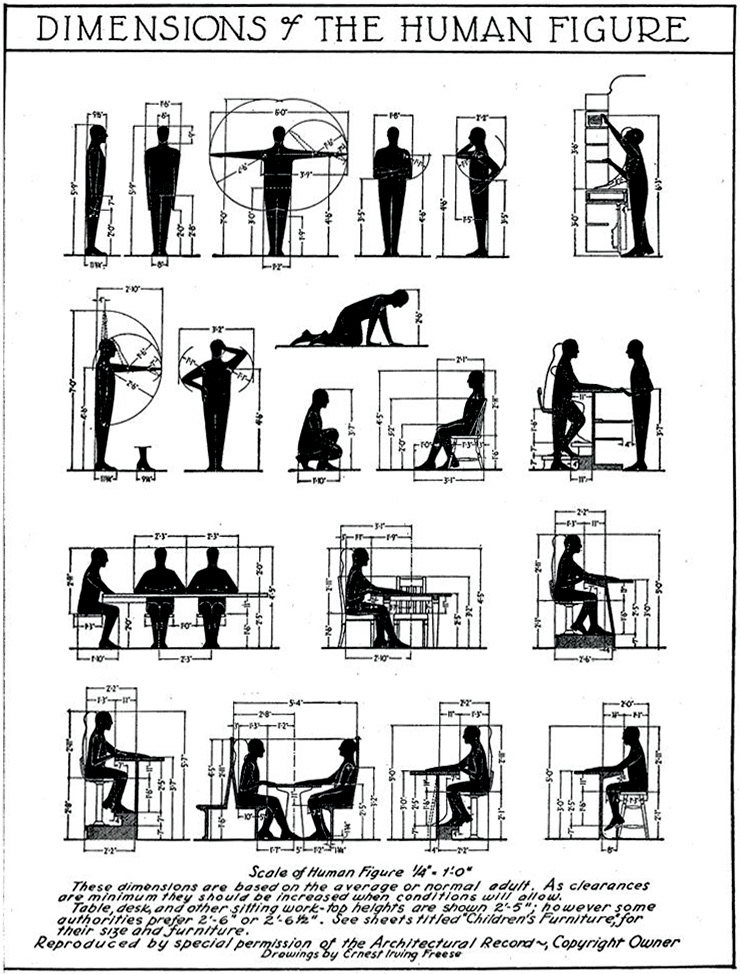
While the drawing might be 100 years old - the information in it is reasonably accurate. (Or are people much taller then they were in the early 1900s?) While I might draw up a really interesting-looking chair design - I have to check that design against typical dimension standards to ensure people will be able to use it.
The first chair I ever designed and built did not have this benefit. Here it is:
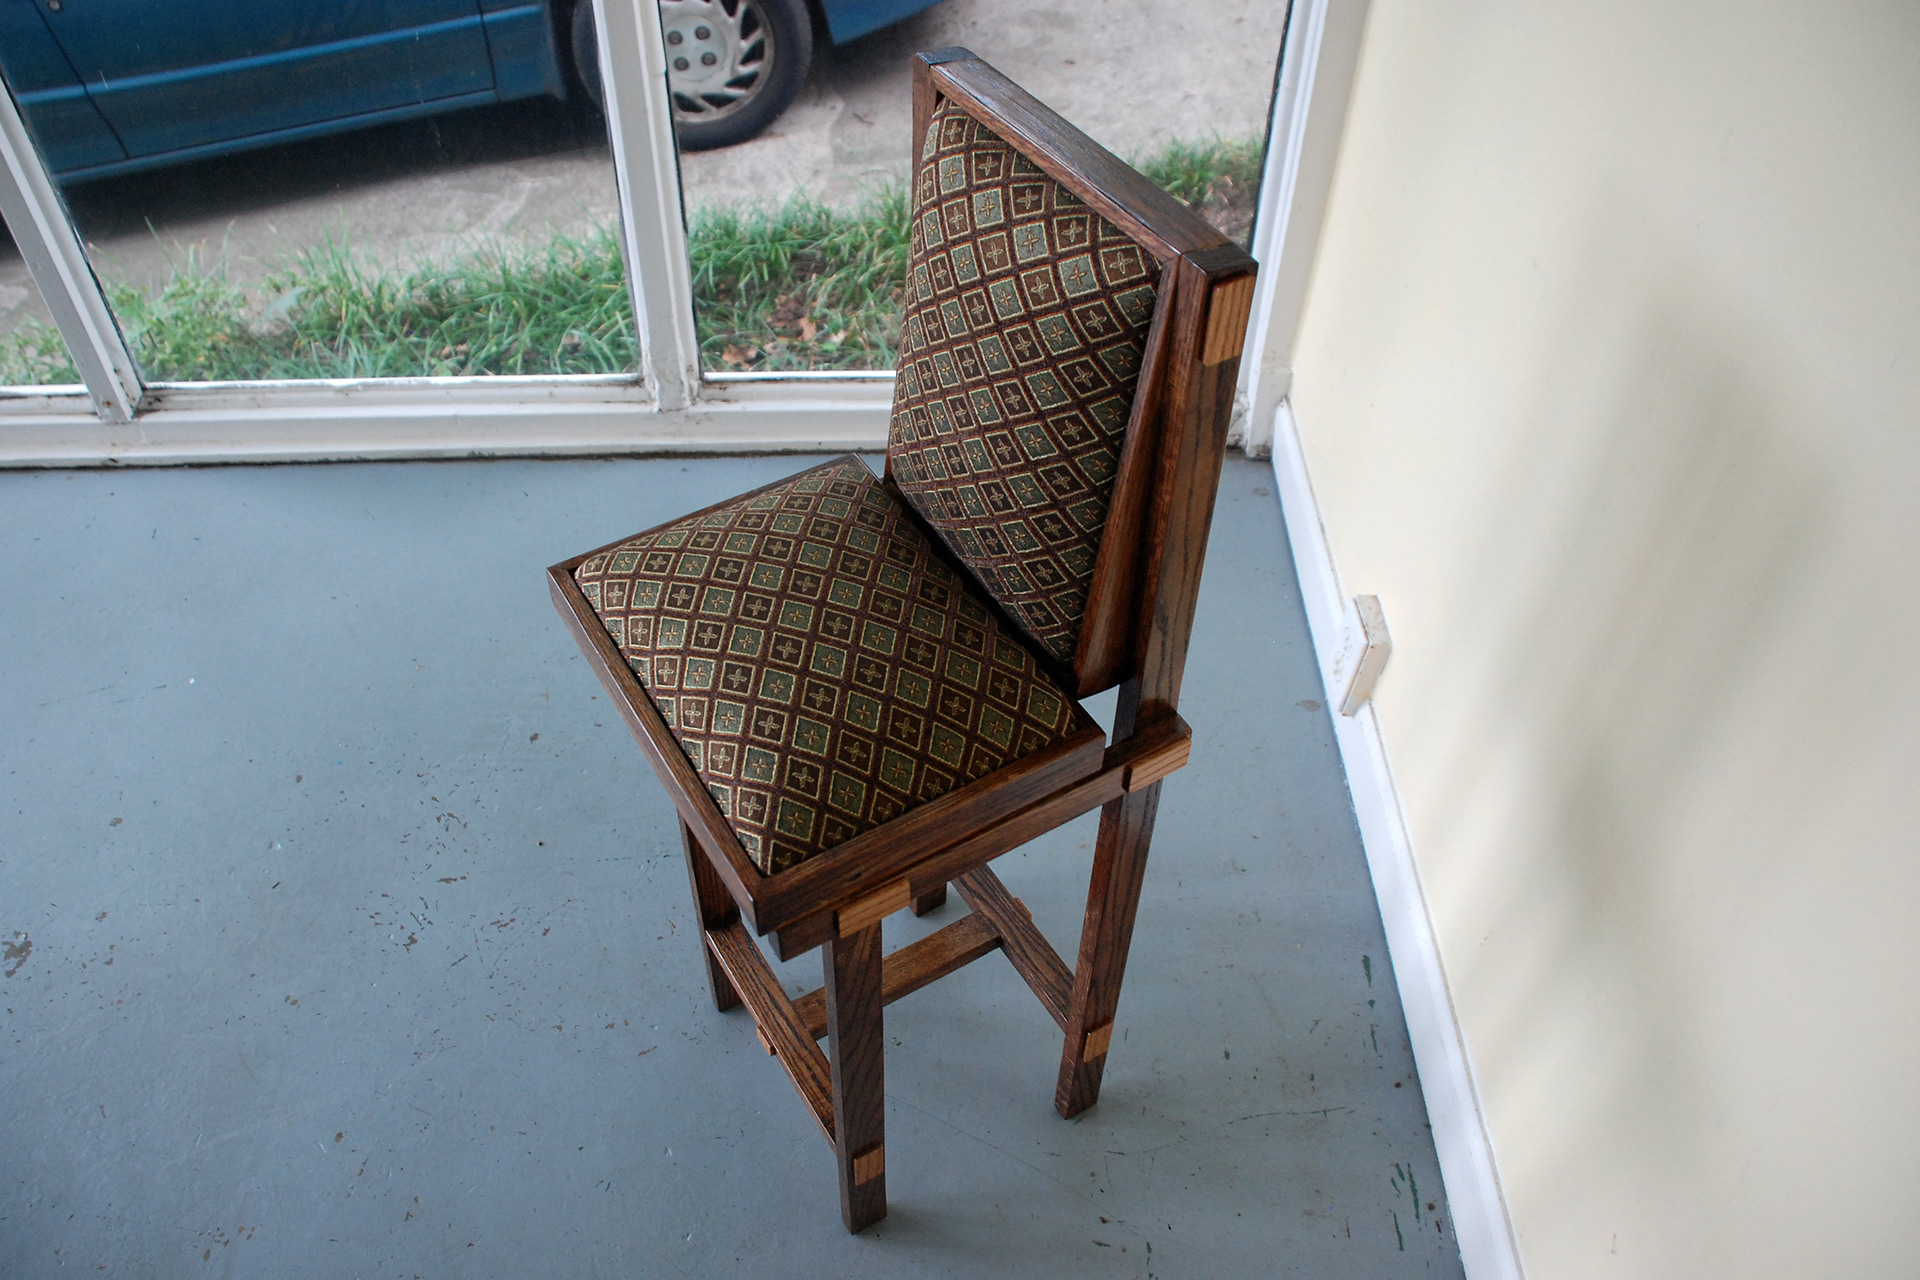
Sure, it looked nice (I think) - but the seat was a bit too small and high, and the angle between it and the backrest a little too narrow. If I had paid more attention to the standard dimensions before I started - I might have adjusted my design to be more comfortable. Regardless, it ended up working pretty well as a 'dressing chair' - and was sold at a charity art auction (lemonade from lemons and all that).
Back to the chair this post is supposed to be discussing - the 8.5 Degree Chair:

The chair has overall dimensions of 23” x 20” x 54” (LWH):
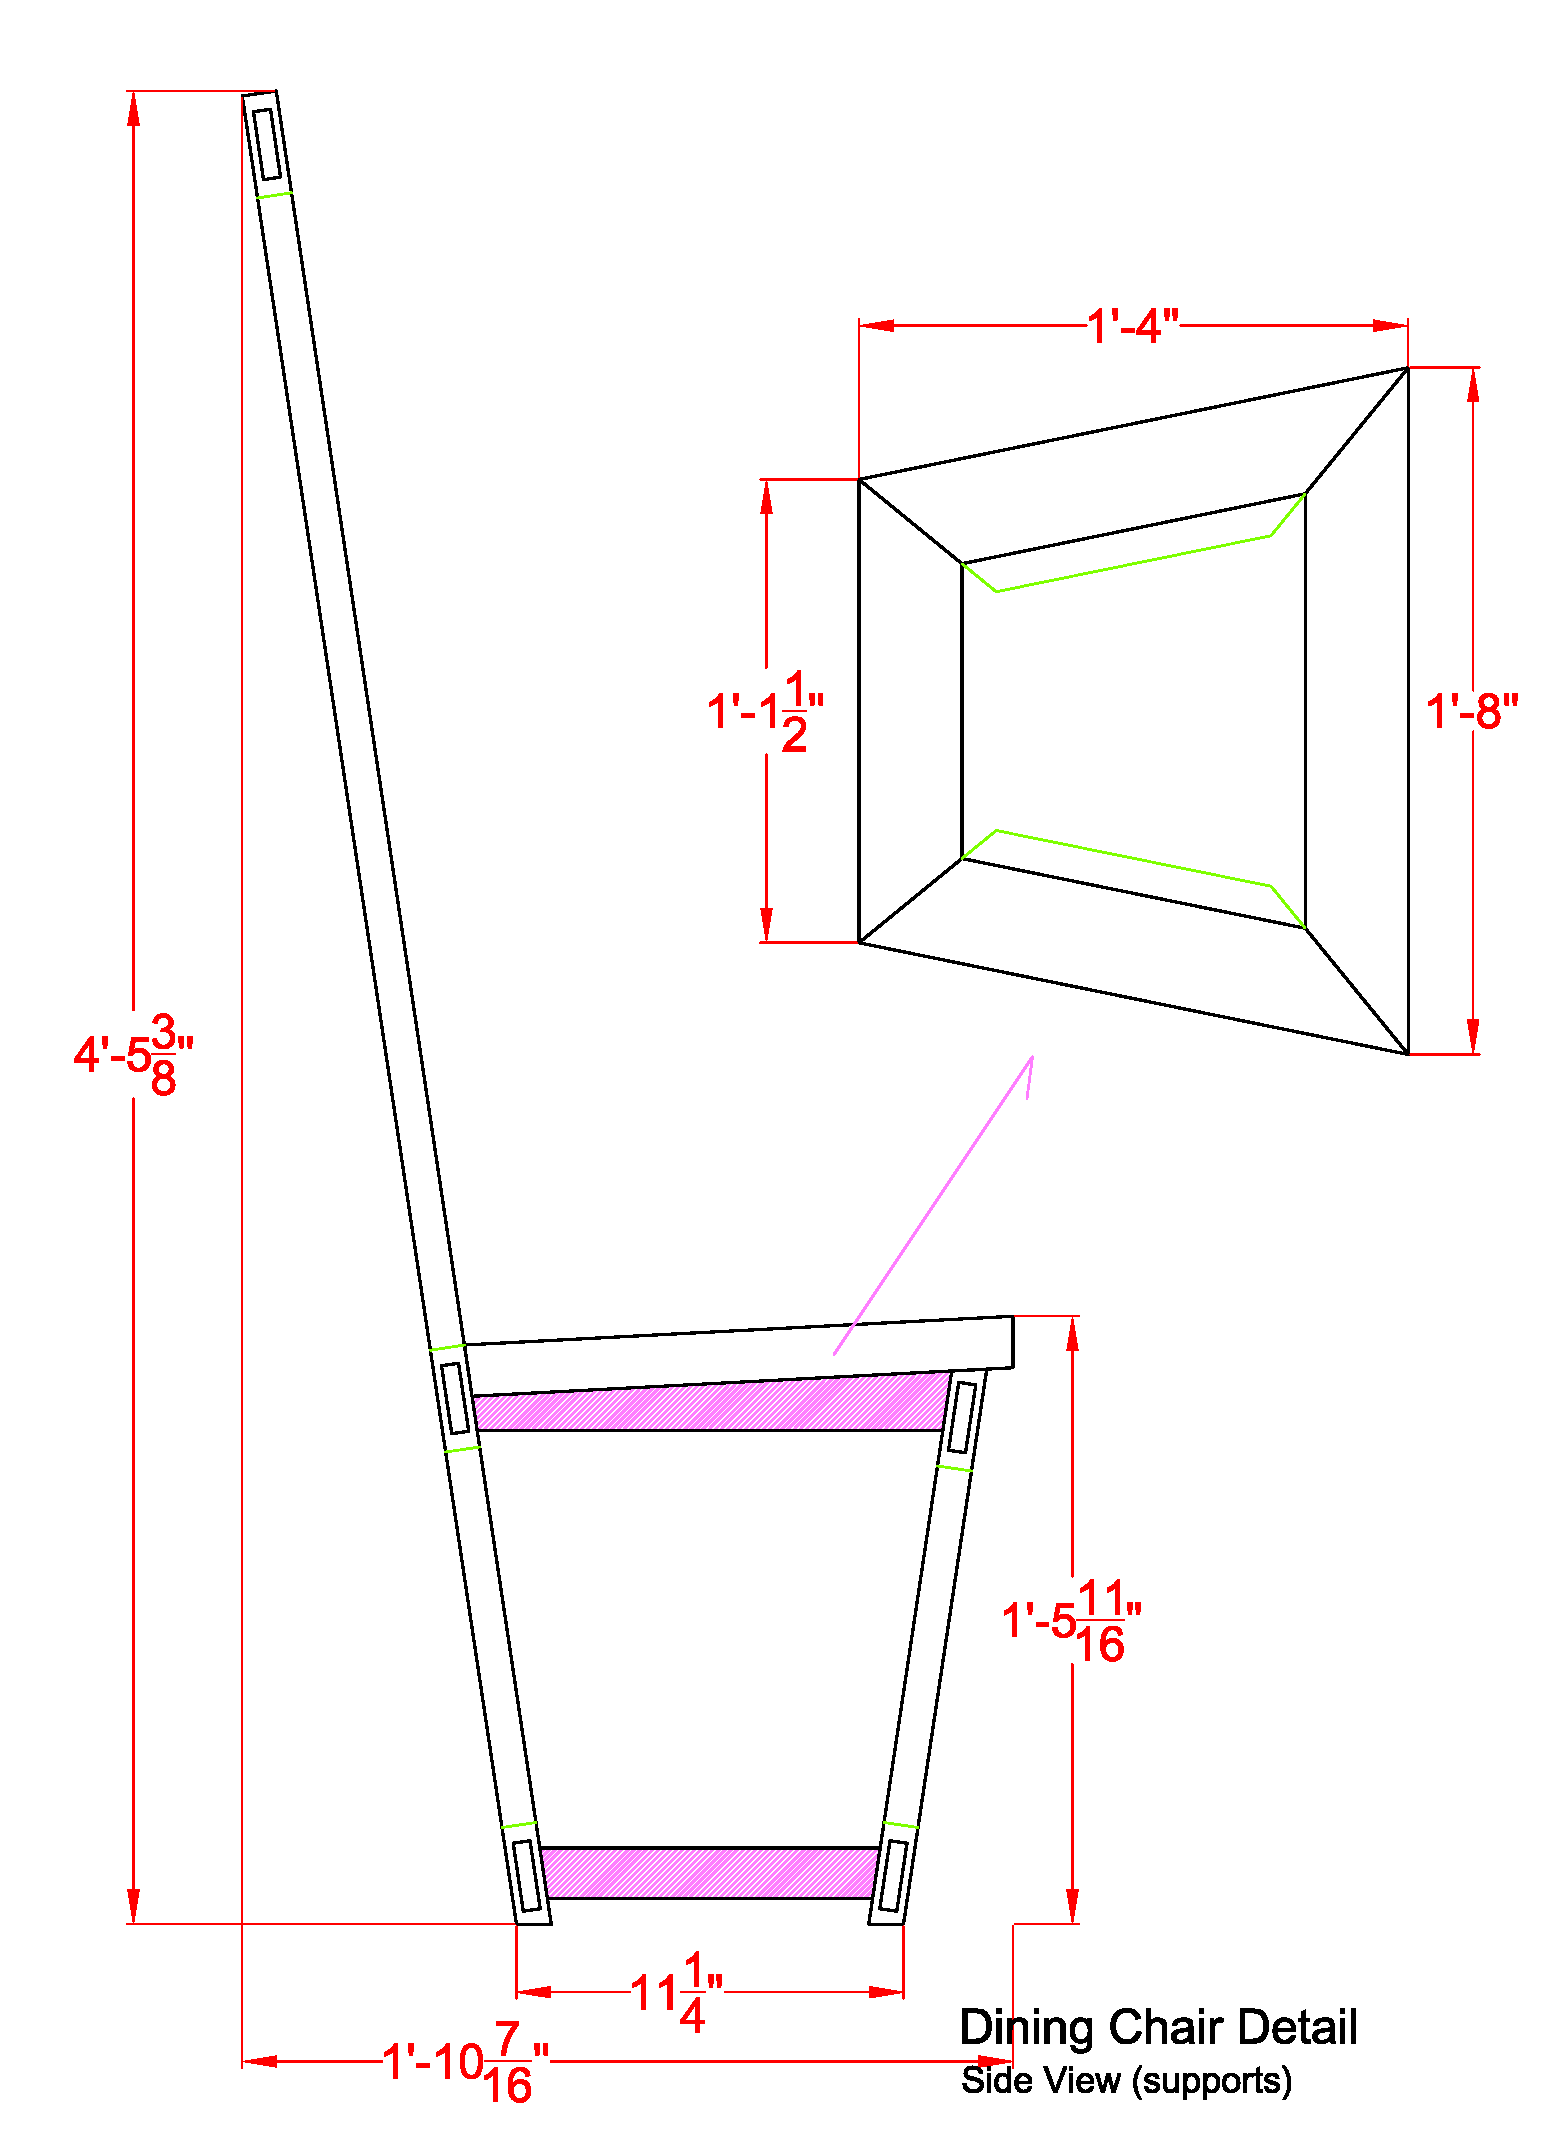
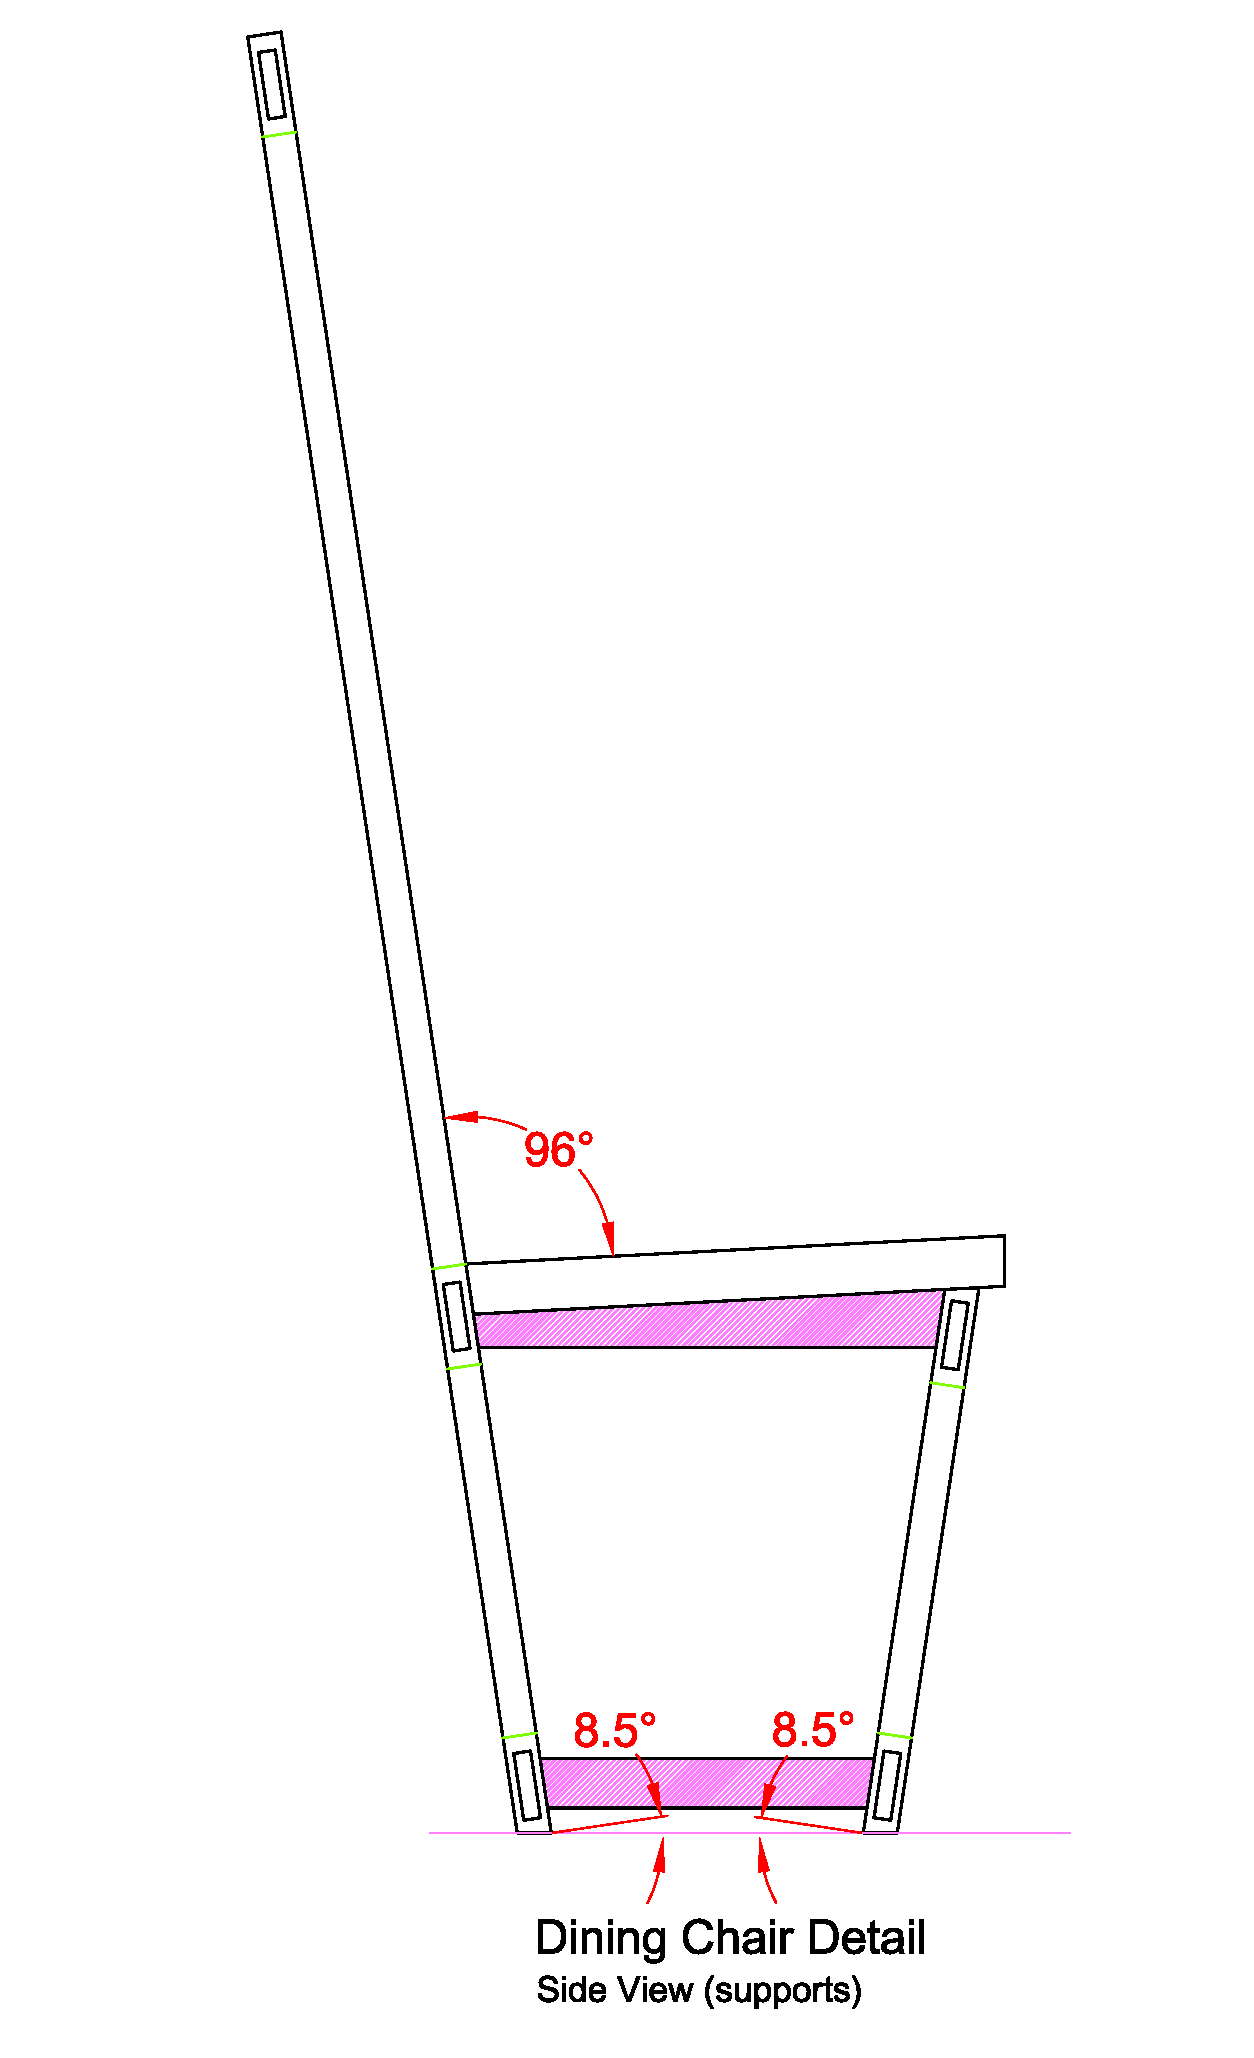
I like to title the things I make very descriptively, hence the '8.5 Degree' in the name of this piece. The 8.5 degrees refers to the angles between the plane of the floor and both the front and rear legs:
I settled on this angle for two reasons.
One: because the center of gravity of a person sitting on the chair was kept reasonable stable.
Two: because I liked the way it looked (by far the better reason).
One: because the center of gravity of a person sitting on the chair was kept reasonable stable.
Two: because I liked the way it looked (by far the better reason).
Also, the chair seat is angled slightly back (3 degrees) - and the angle between the chair seat and the backrest is about 6 degrees - well in the range for formal chairs as dictated by the standards people. A more 'comfortable' chair back might be angled as much as 15 degrees - but I was going for a more formal appearance and feel (just go ahead and try to slouch in my chair).
Now that we have the size and angle details of the chair figured out, the next step is to draw up some kind of plan. I'm not going to get too specific here - I could write endlessly about scale rulers, computer aided drafting, blue line paper, orthographic drawing, etc. But that would be going beyond the spirit of this blog entry. I'm trying to keep things simple (KISS method) for now. But I will recommend a couple of things for anyone who wants to try some computer aided design and drafting: Google SketchUp is a nice, free, 3D modeling program (and a great way for the novice to start). My second recommendation is AutoCAD - unfortunately not nearly as simple to start using as SketchUp (or as free) - but a very powerful program. AutoCAD is what I use, so I may be a wee bit biased. If designing on the computer isn't for you - then don't be afraid to pick up a pencil and start sketching by hand. Just keep a close eye on your math and measurements - and don't forget to consider things from every side. (Good advice for those drawing on the computer, too!)
Ok, we have a plan, but before we can get to construction, we need to consider materials.
Materials:
I used mostly inexpensive dimensional lumber to build my chair (aka, 2x4s that were lying around my house) with a little oak thrown in for good measure. The lumber you buy will have an impact on how you end up building your chair, so it can be important to think about it when you're drawing up your design.
Now might be a good time to take a look at a previous post of mine (if you haven't already) for more information about lumber: Lumber and Timber and Wood, Oh My! It goes through some basics and should be helpful.
The size of the material can be important because it dictates how thick the sections of your work will be. For example, I used ripped 2" thick material (actually 1.5", right? That would make sense if you read the other post) for the legs and framing of the chair. Since the wood was a good thickness to begin with, I just designed the chair pieces to take advantage of that thickness - as well as ensure I would have enough strength in the chair to hold up a person. If I were building another chair like this one, I might use harder or thicker wood to build in more of a material strength safety margin (no one wants to sit in a chair that might collapse!) ;)
Construction:
We're getting to the point where taking a look at my whole drawing (drafting) might be helpful. I've posted an image of my drawings here (below) - but you'll have to check out my Patreon page for access to the full-sized drawing!
I try to be as thorough as possible with my drawings. I'll do multiple versions as I build something, thus ensuring I always have current information. (I might want to build another someday - or share it on a blog....)
This was a relatively simple project - requiring only one main drawing (I typically draw on 12" x 18" paper - the largest my printer can print):

Once we have our design and materials - it's time to start putting things together.
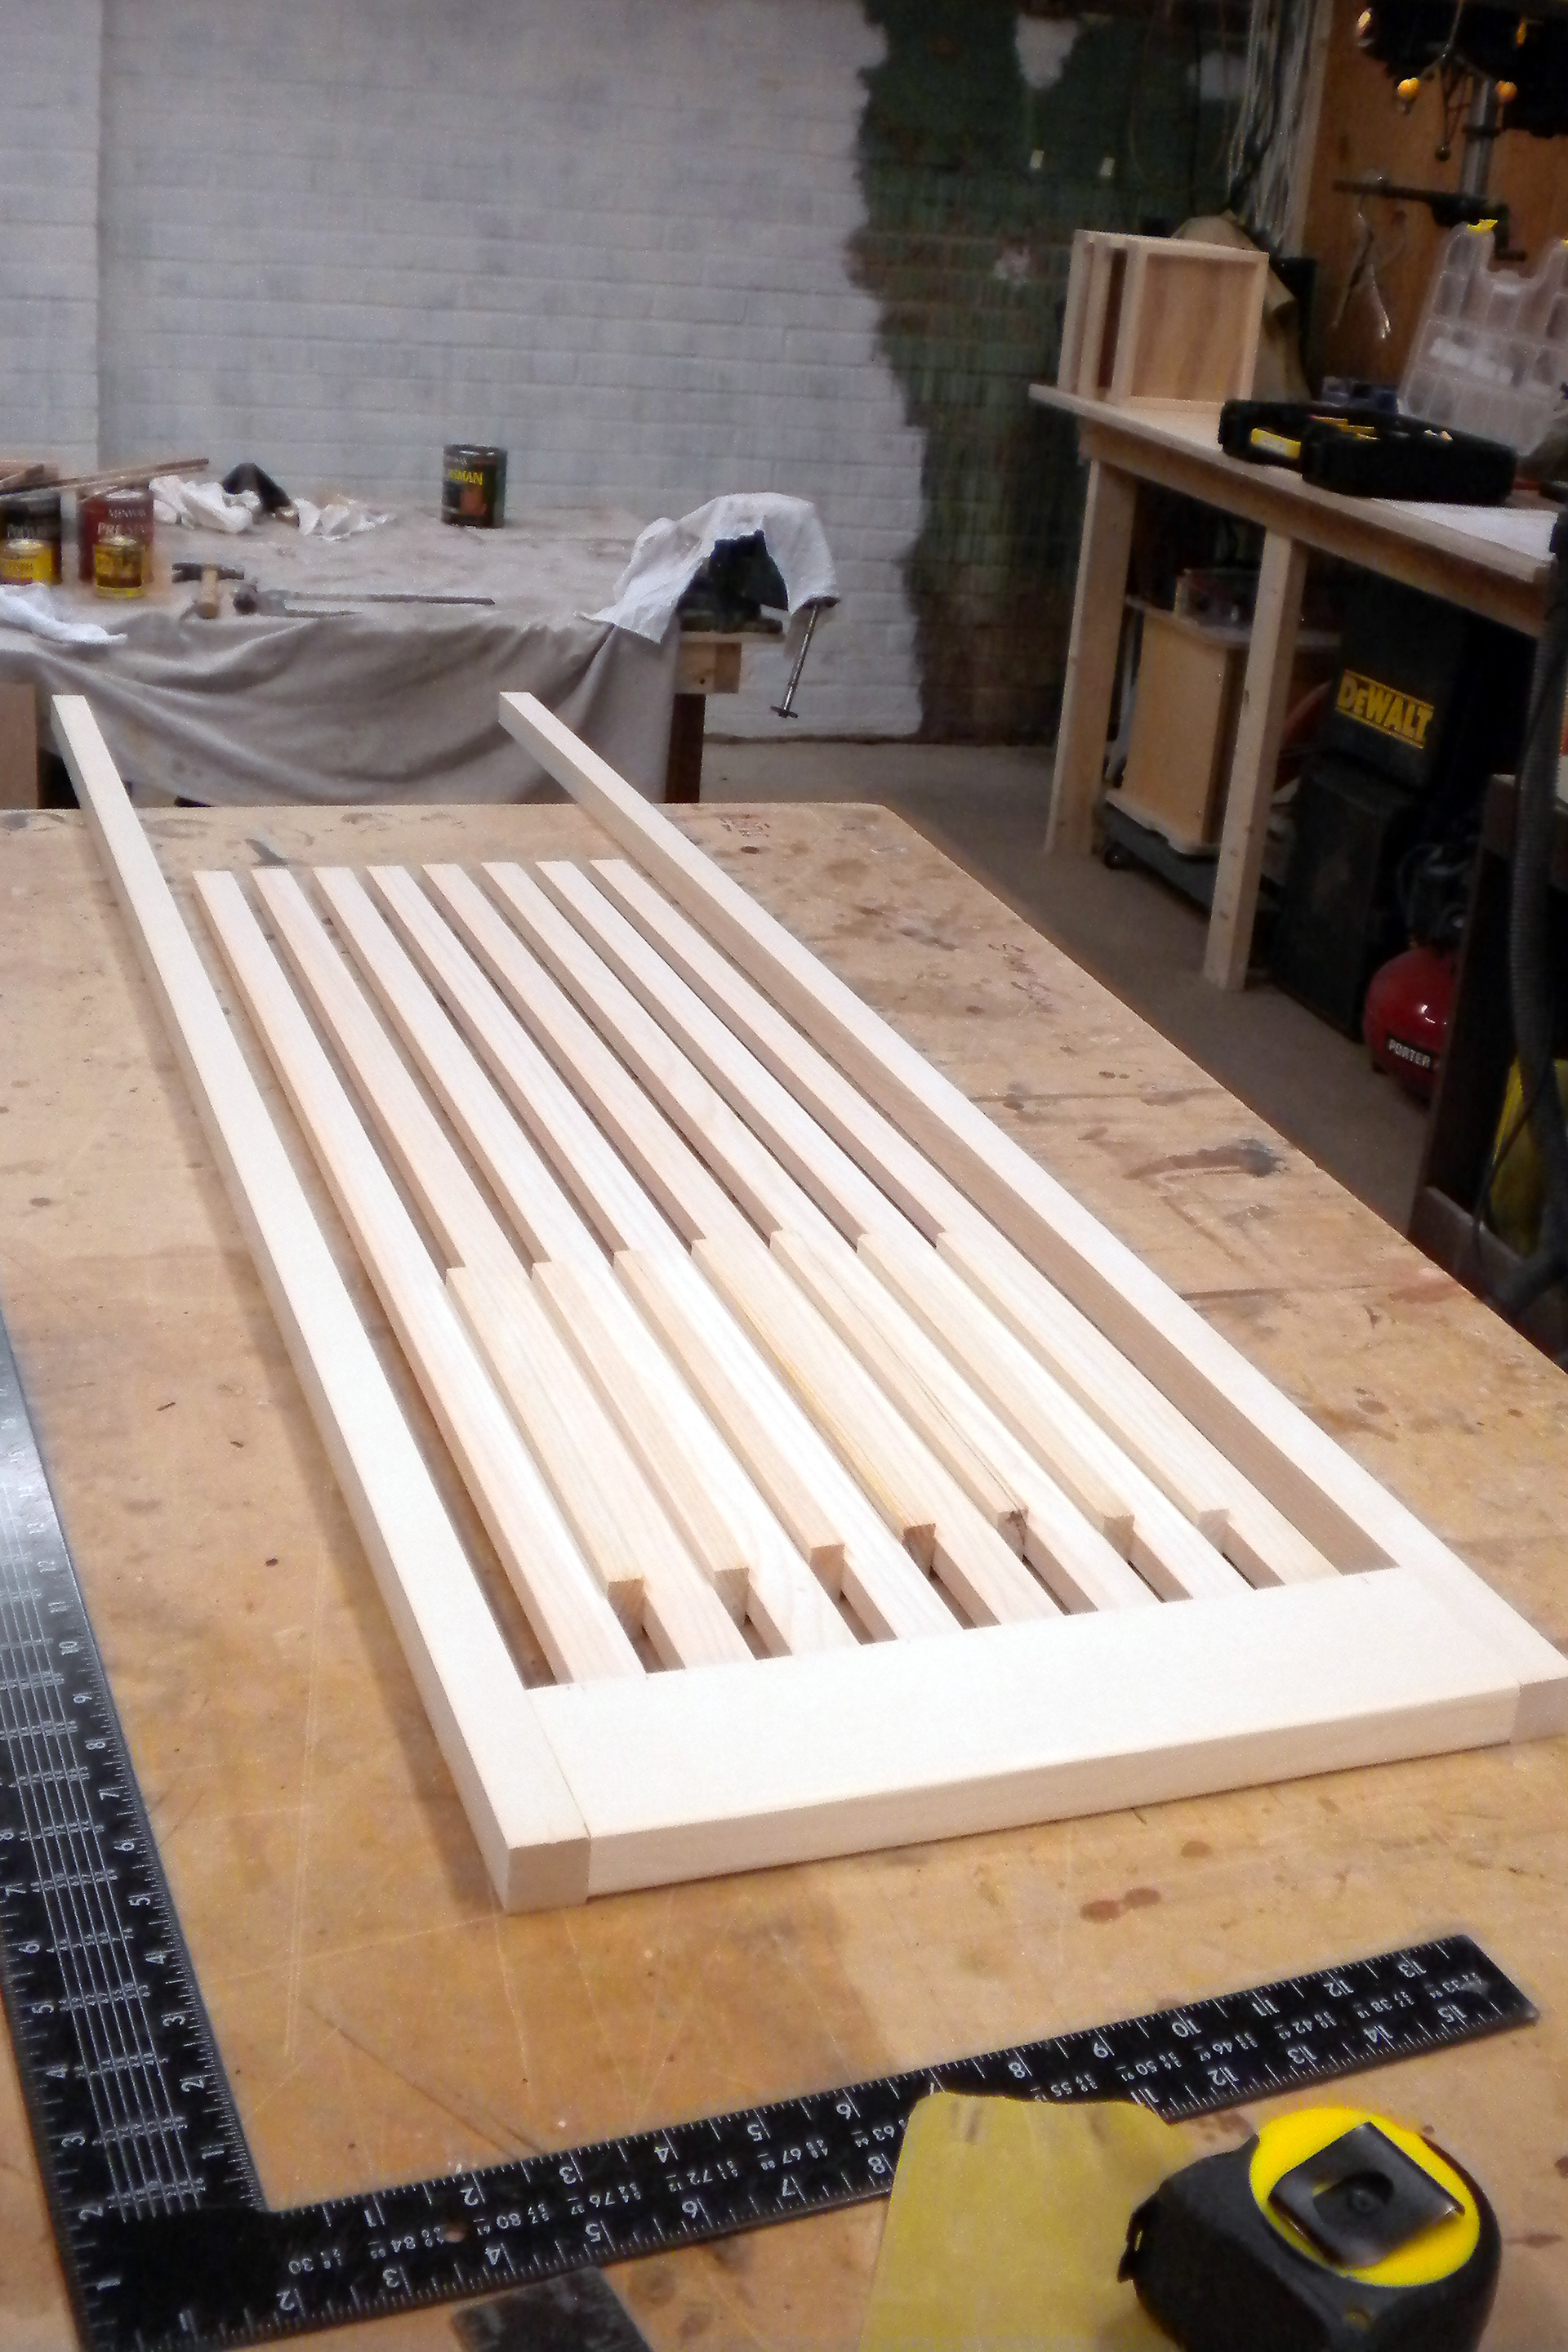
Every crafts-person I've met has a slightly different approach to attaching sections of lumber together. There are countless types and classifications of fasteners (*sigh* yet another separate post I should write...) including: nails, staples, glue, screws, joinery, biscuits, etc. They all have their pros and cons. Personally, I'm a huge fan of modern wood glues. Often, glue is laid down along a joint, the joint is clamped together, and then some other kind of fastener is applied (i.e., screw, staple, etc.). Depending on the project, I'll often forgo the metal fastener entirely and focus on the wood glue as the only attachment method. This avoids the sometimes ugly hardware holes/marks from nails, screws, staples, etc. Modern wood glue (when properly applied and clamped) typically dries harder than the wood around it - making for a very strong bond (the wood will break before the glue). Here is a photo of the backrest slats being glued (and drying):
The glue brand I prefer for most any woodworking project is Titebond. Glue is another one of those huge topics - and the science and history behind it is pretty interesting (if you happen to like that kind of thing... which I do).
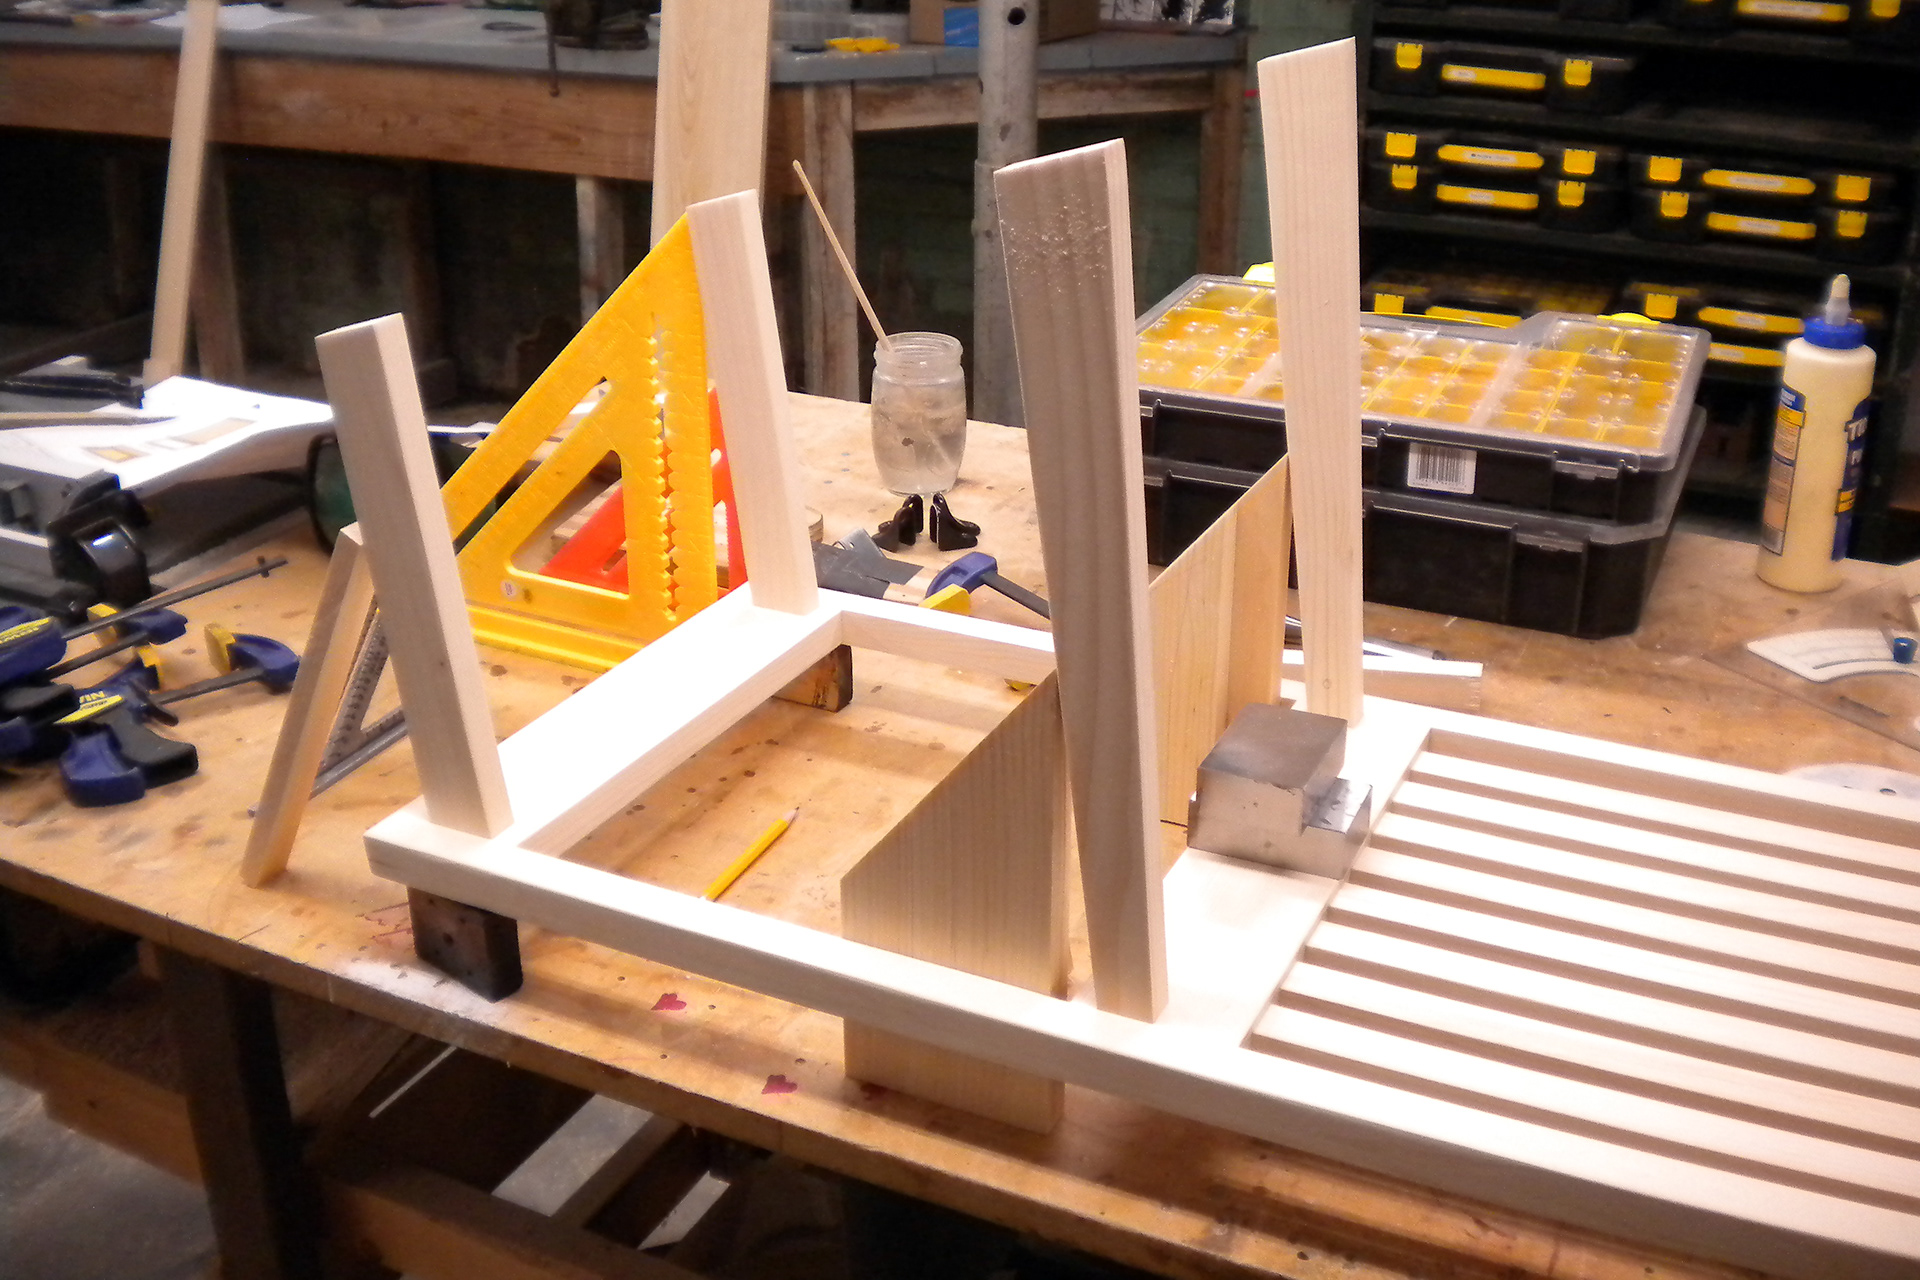
While I did use plenty of glue in this project - there are times when metal fasteners should be used - particularly when strength, weight, or exposure is an issue. I also have steel wood screws hidden behind the oak strips decorating the chair's major edges. Chair frames have to take a lot of weird forces as people sit and wiggle around on them, and screws will hold things together if the the glue starts to weaken (again, we don't want any collapsing chairs - that would be embarrassing). Here is another process shot - the framing being attached to the backrest (glue AND screws):
And another of the almost-finished product (sans oak seat panel):

As the above photos shows, we're just about at the 'finishing' stage of the project. As mentioned earlier, now might be another good time to take a look at a previous post of mine (if you haven't already) for more information about lumber: Lumber and Timber and Wood, Oh My! It discusses finishing materials in slightly more depth. For this project, I chose to varnish the chair with semi-gloss polyurethane (2-3 coat). This darkened the wood slightly (the oak more then the pine) and added a nice bit of glossiness to the surface. It also had the advantage of adding a layer of protection to the soft pine. My stain and varnish brand of choice is Minwax. And much like glues, the science and history behind finishing agents is also quite intriguing.
Once the piece was varnished - it was pretty much complete.
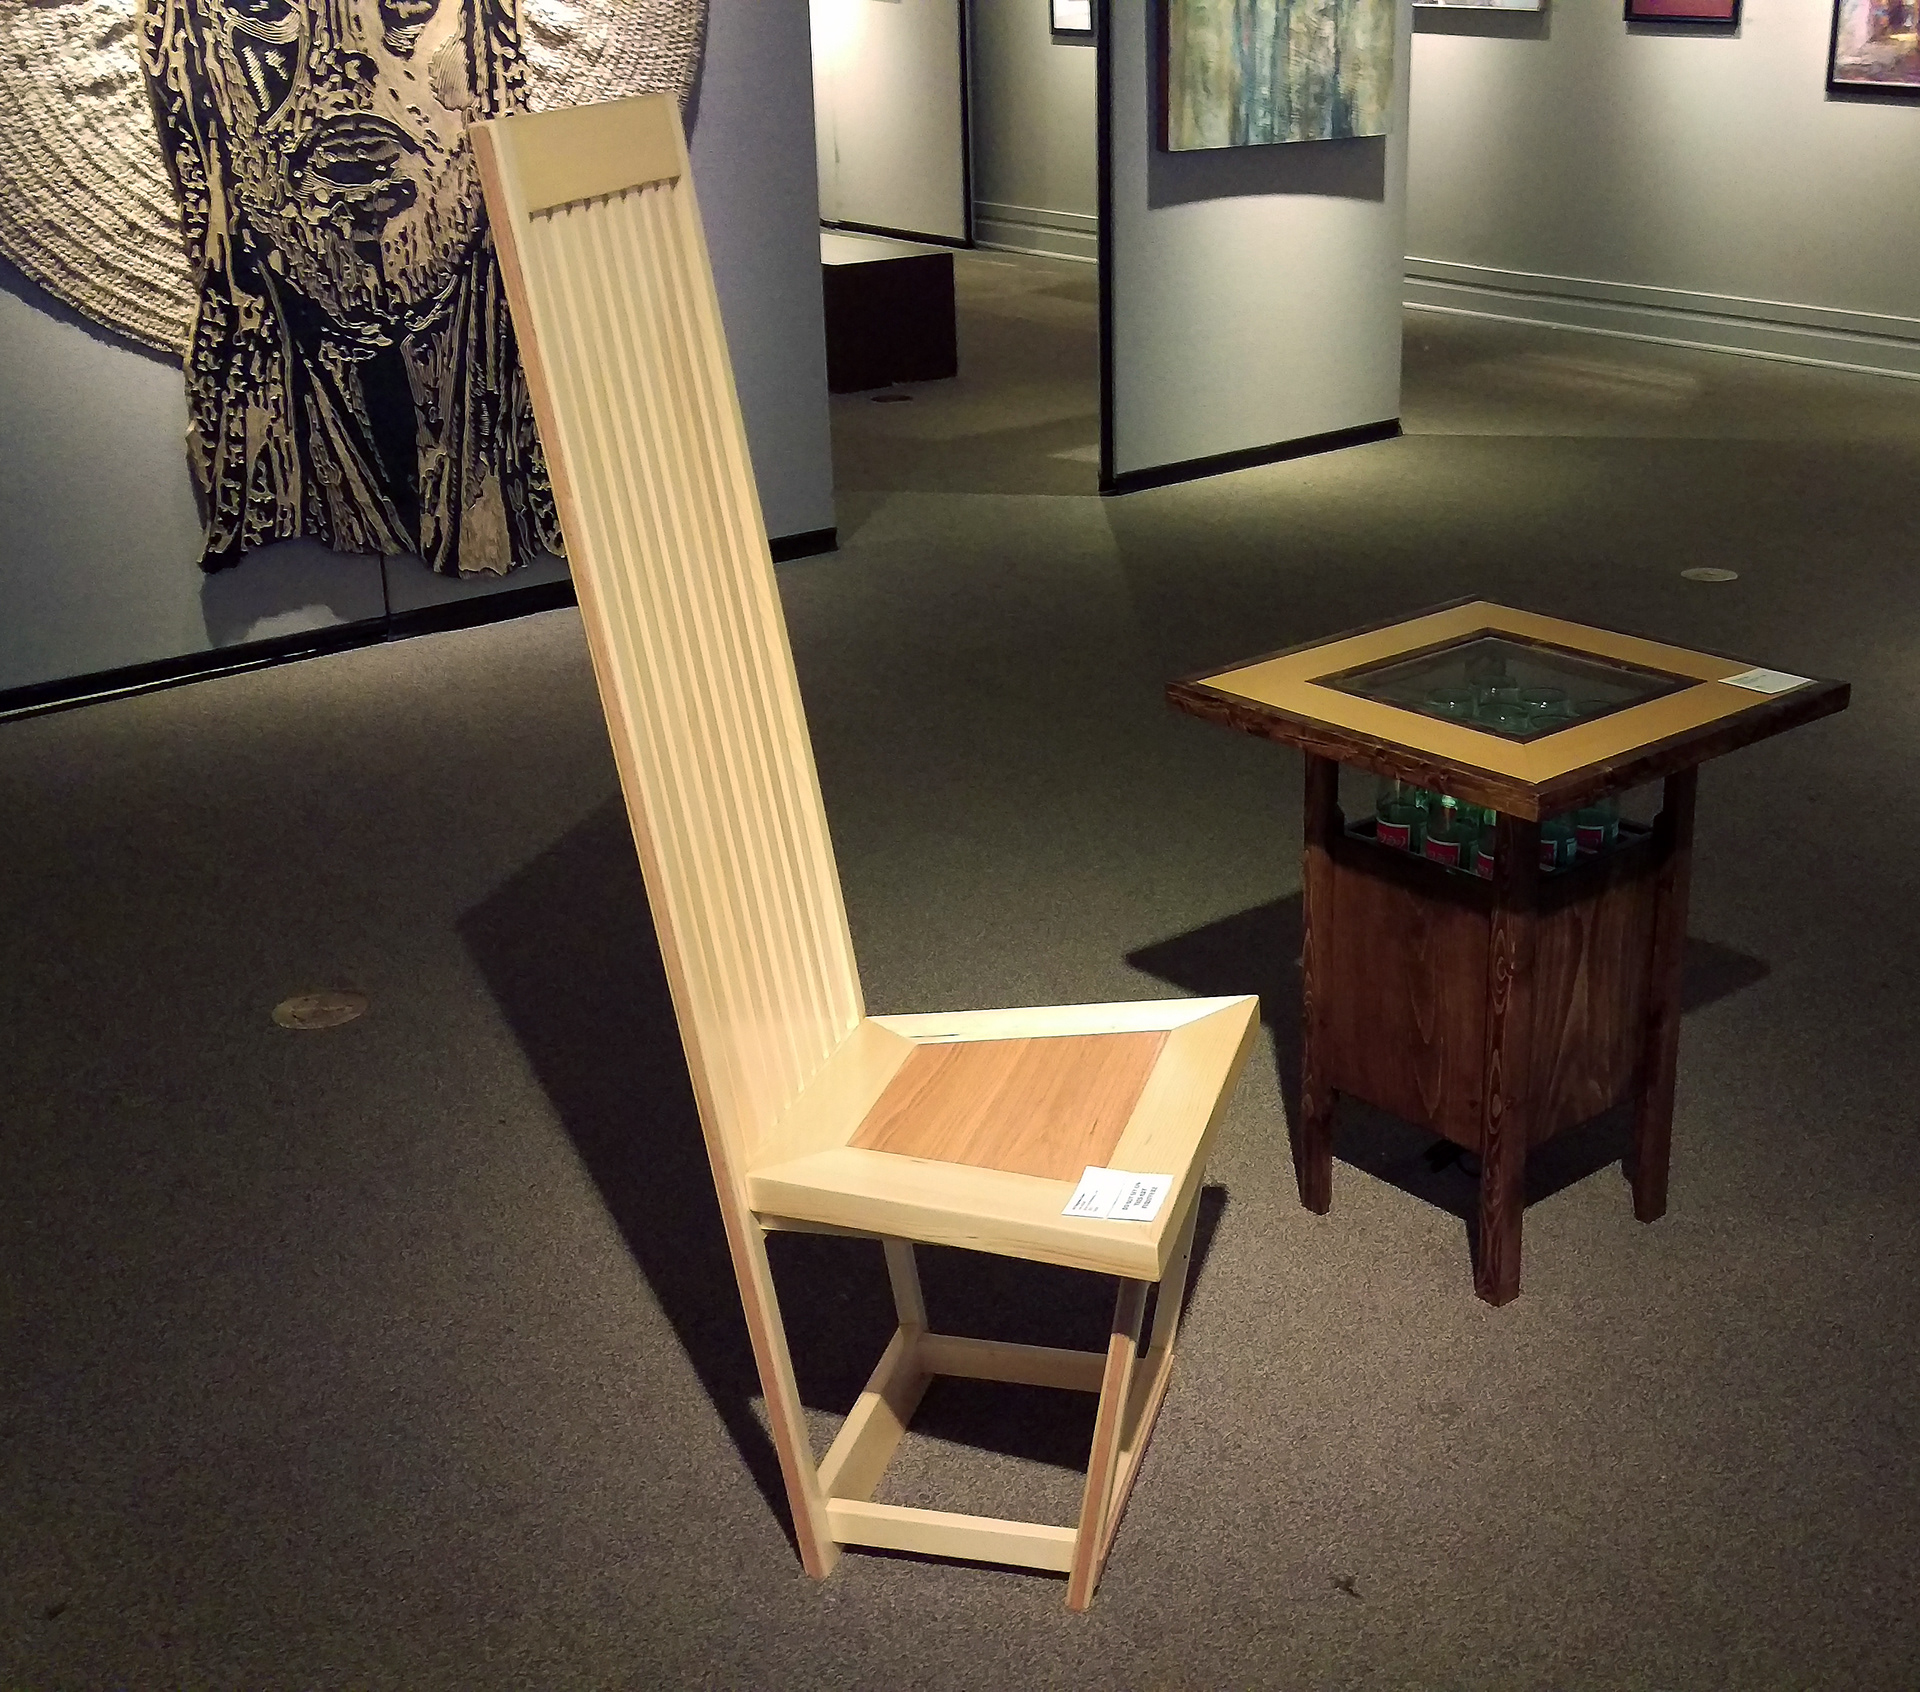
Not long after, I was lucky enough to have it admitted to a juried art exhibition (where it was sold): :)
As I mentioned earlier, this project is intended to be a starting place for thinking about your own chair designs - not necessarily an exact instruction set for building a duplicate chair (although that would be cool - send me pictures!).
Hopefully this post will spark an idea or two... After all, we all need somewhere to put out butts! :)
-Lia
Contact Me
My Writings (Transgender Woodworker content)
Artfully Functional (my studio)
LiaZero.com (all my online content)
My Writings (Transgender Woodworker content)
Artfully Functional (my studio)
LiaZero.com (all my online content)