
One of the purposes of this blog (see my list of goals), is to share past and current workshop project experiences and ideas. This of one of those kinds of blog entries.
Not a lot about transgender issues here, but rest assured, they are never far from my mind. ;)
So, let's get right to discussing designing/building a Wooden Fireplace Mantel.
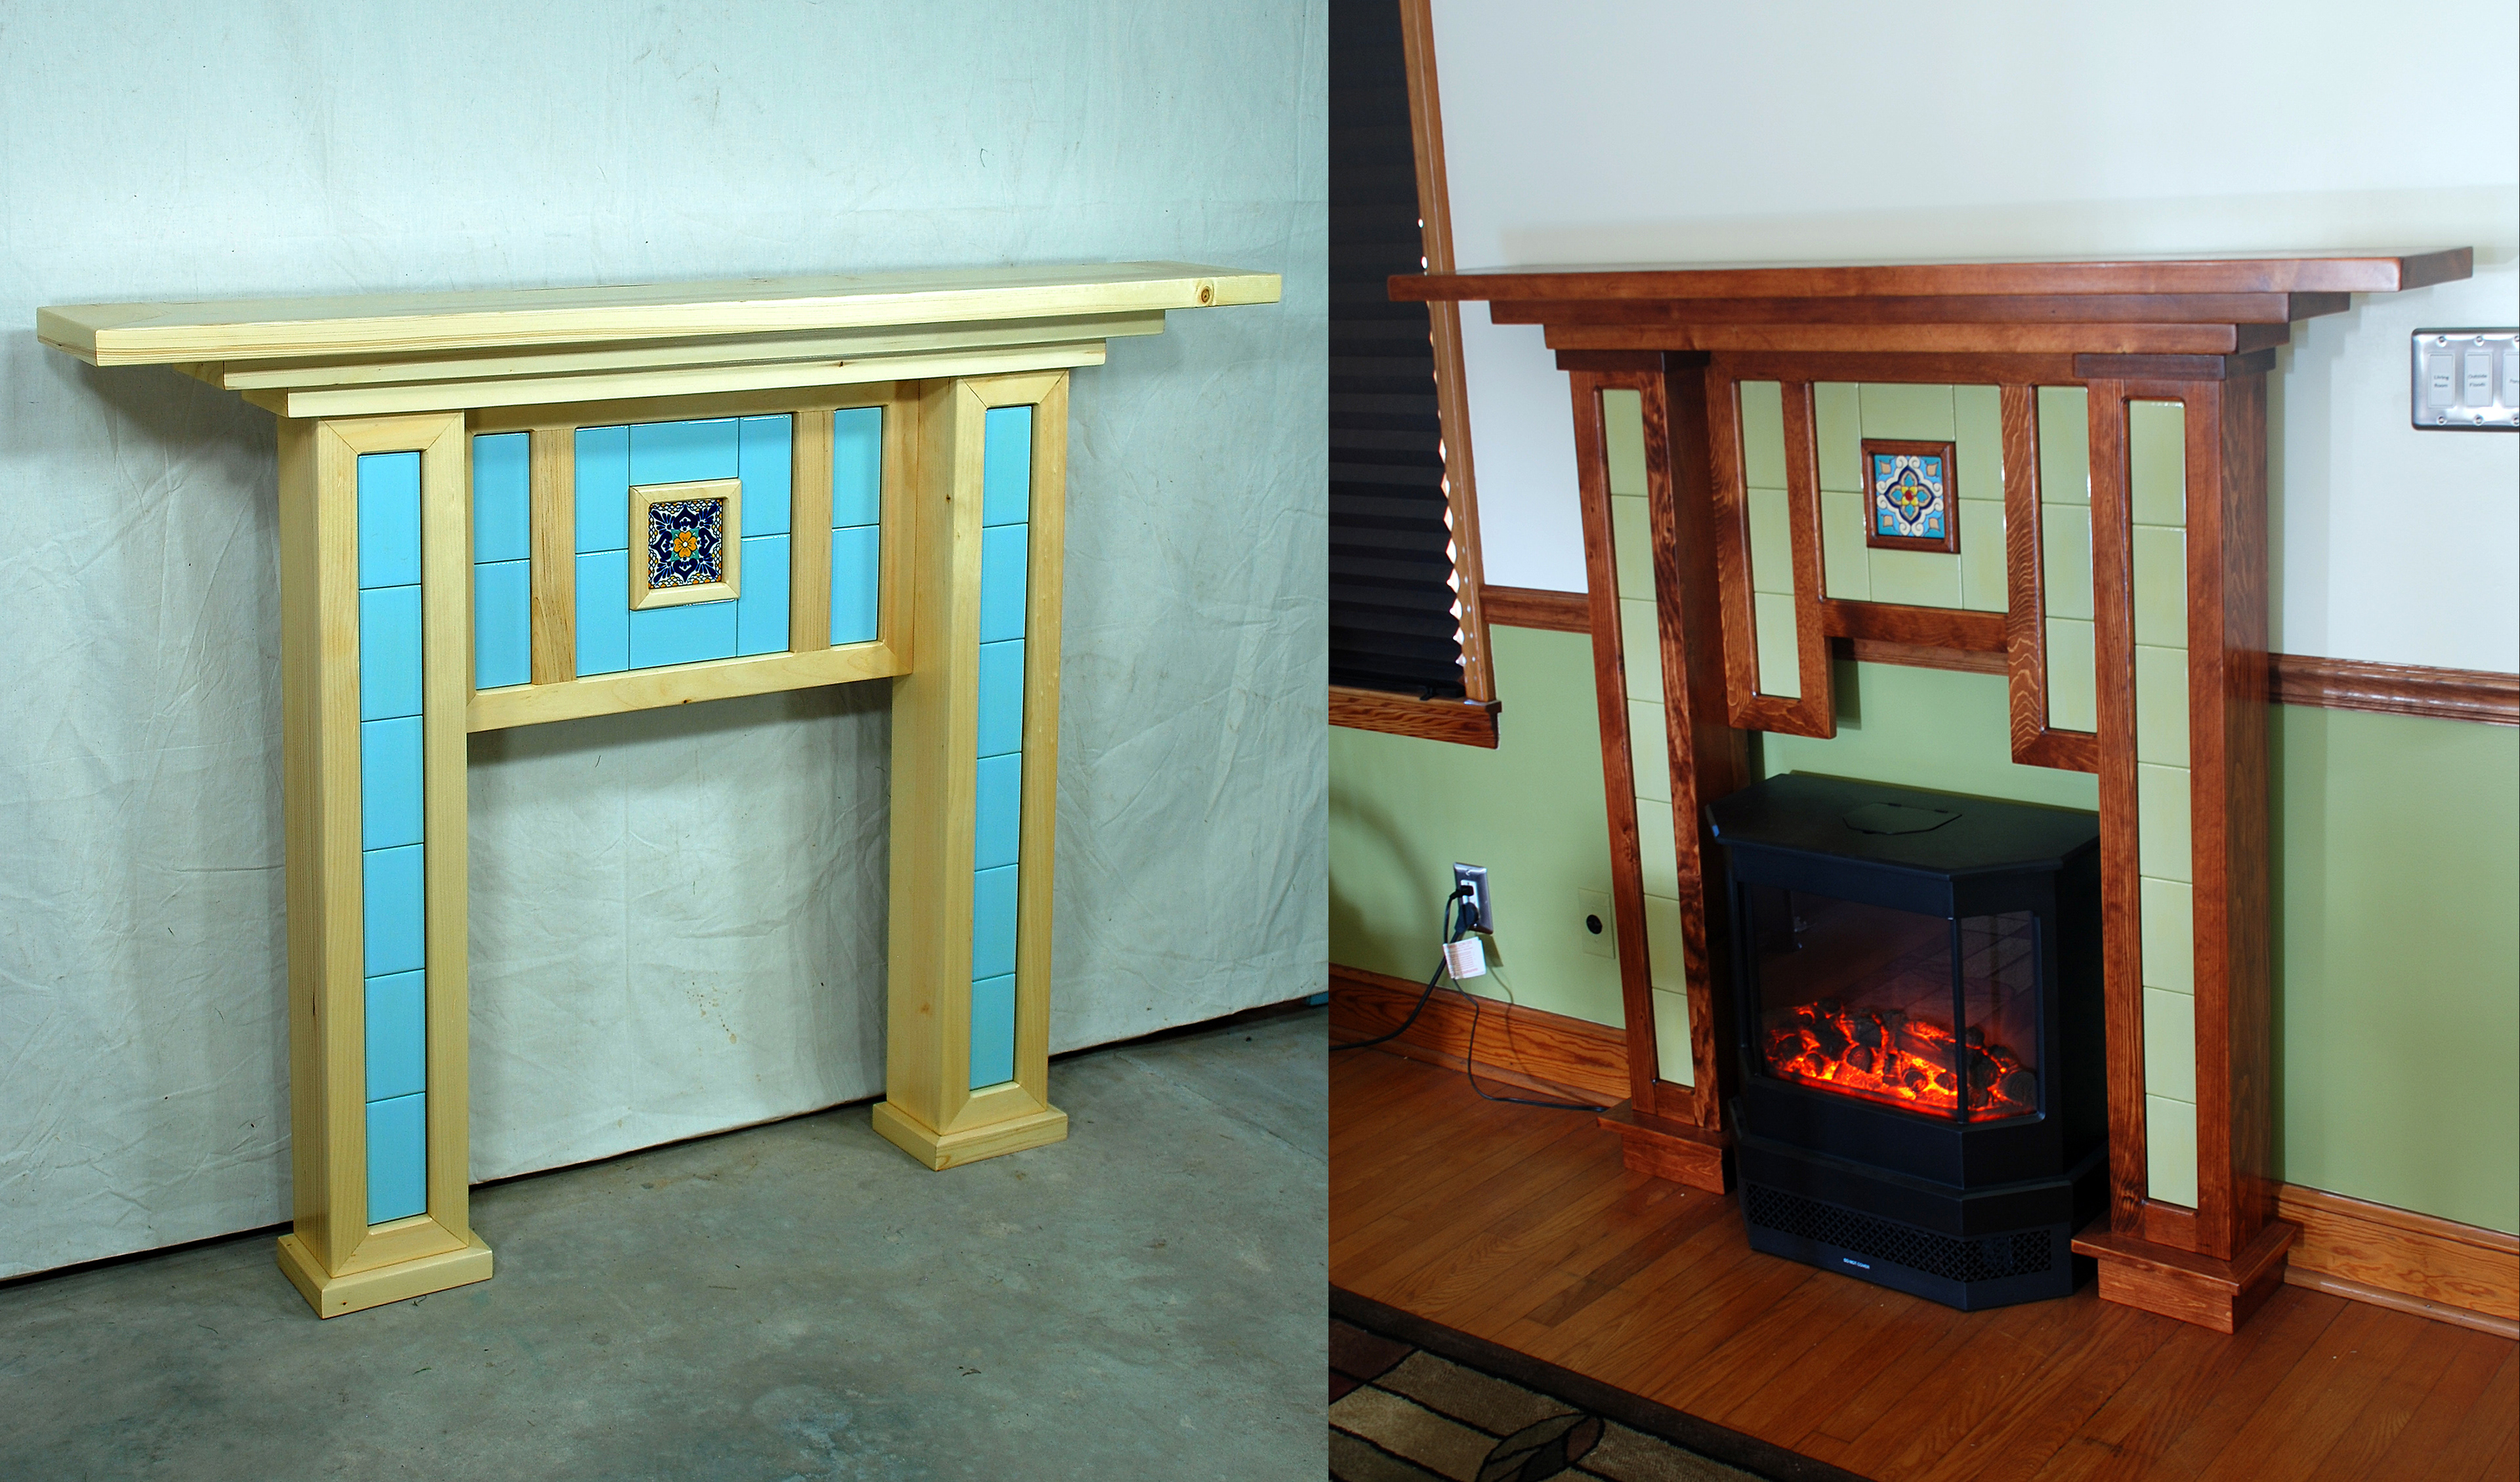
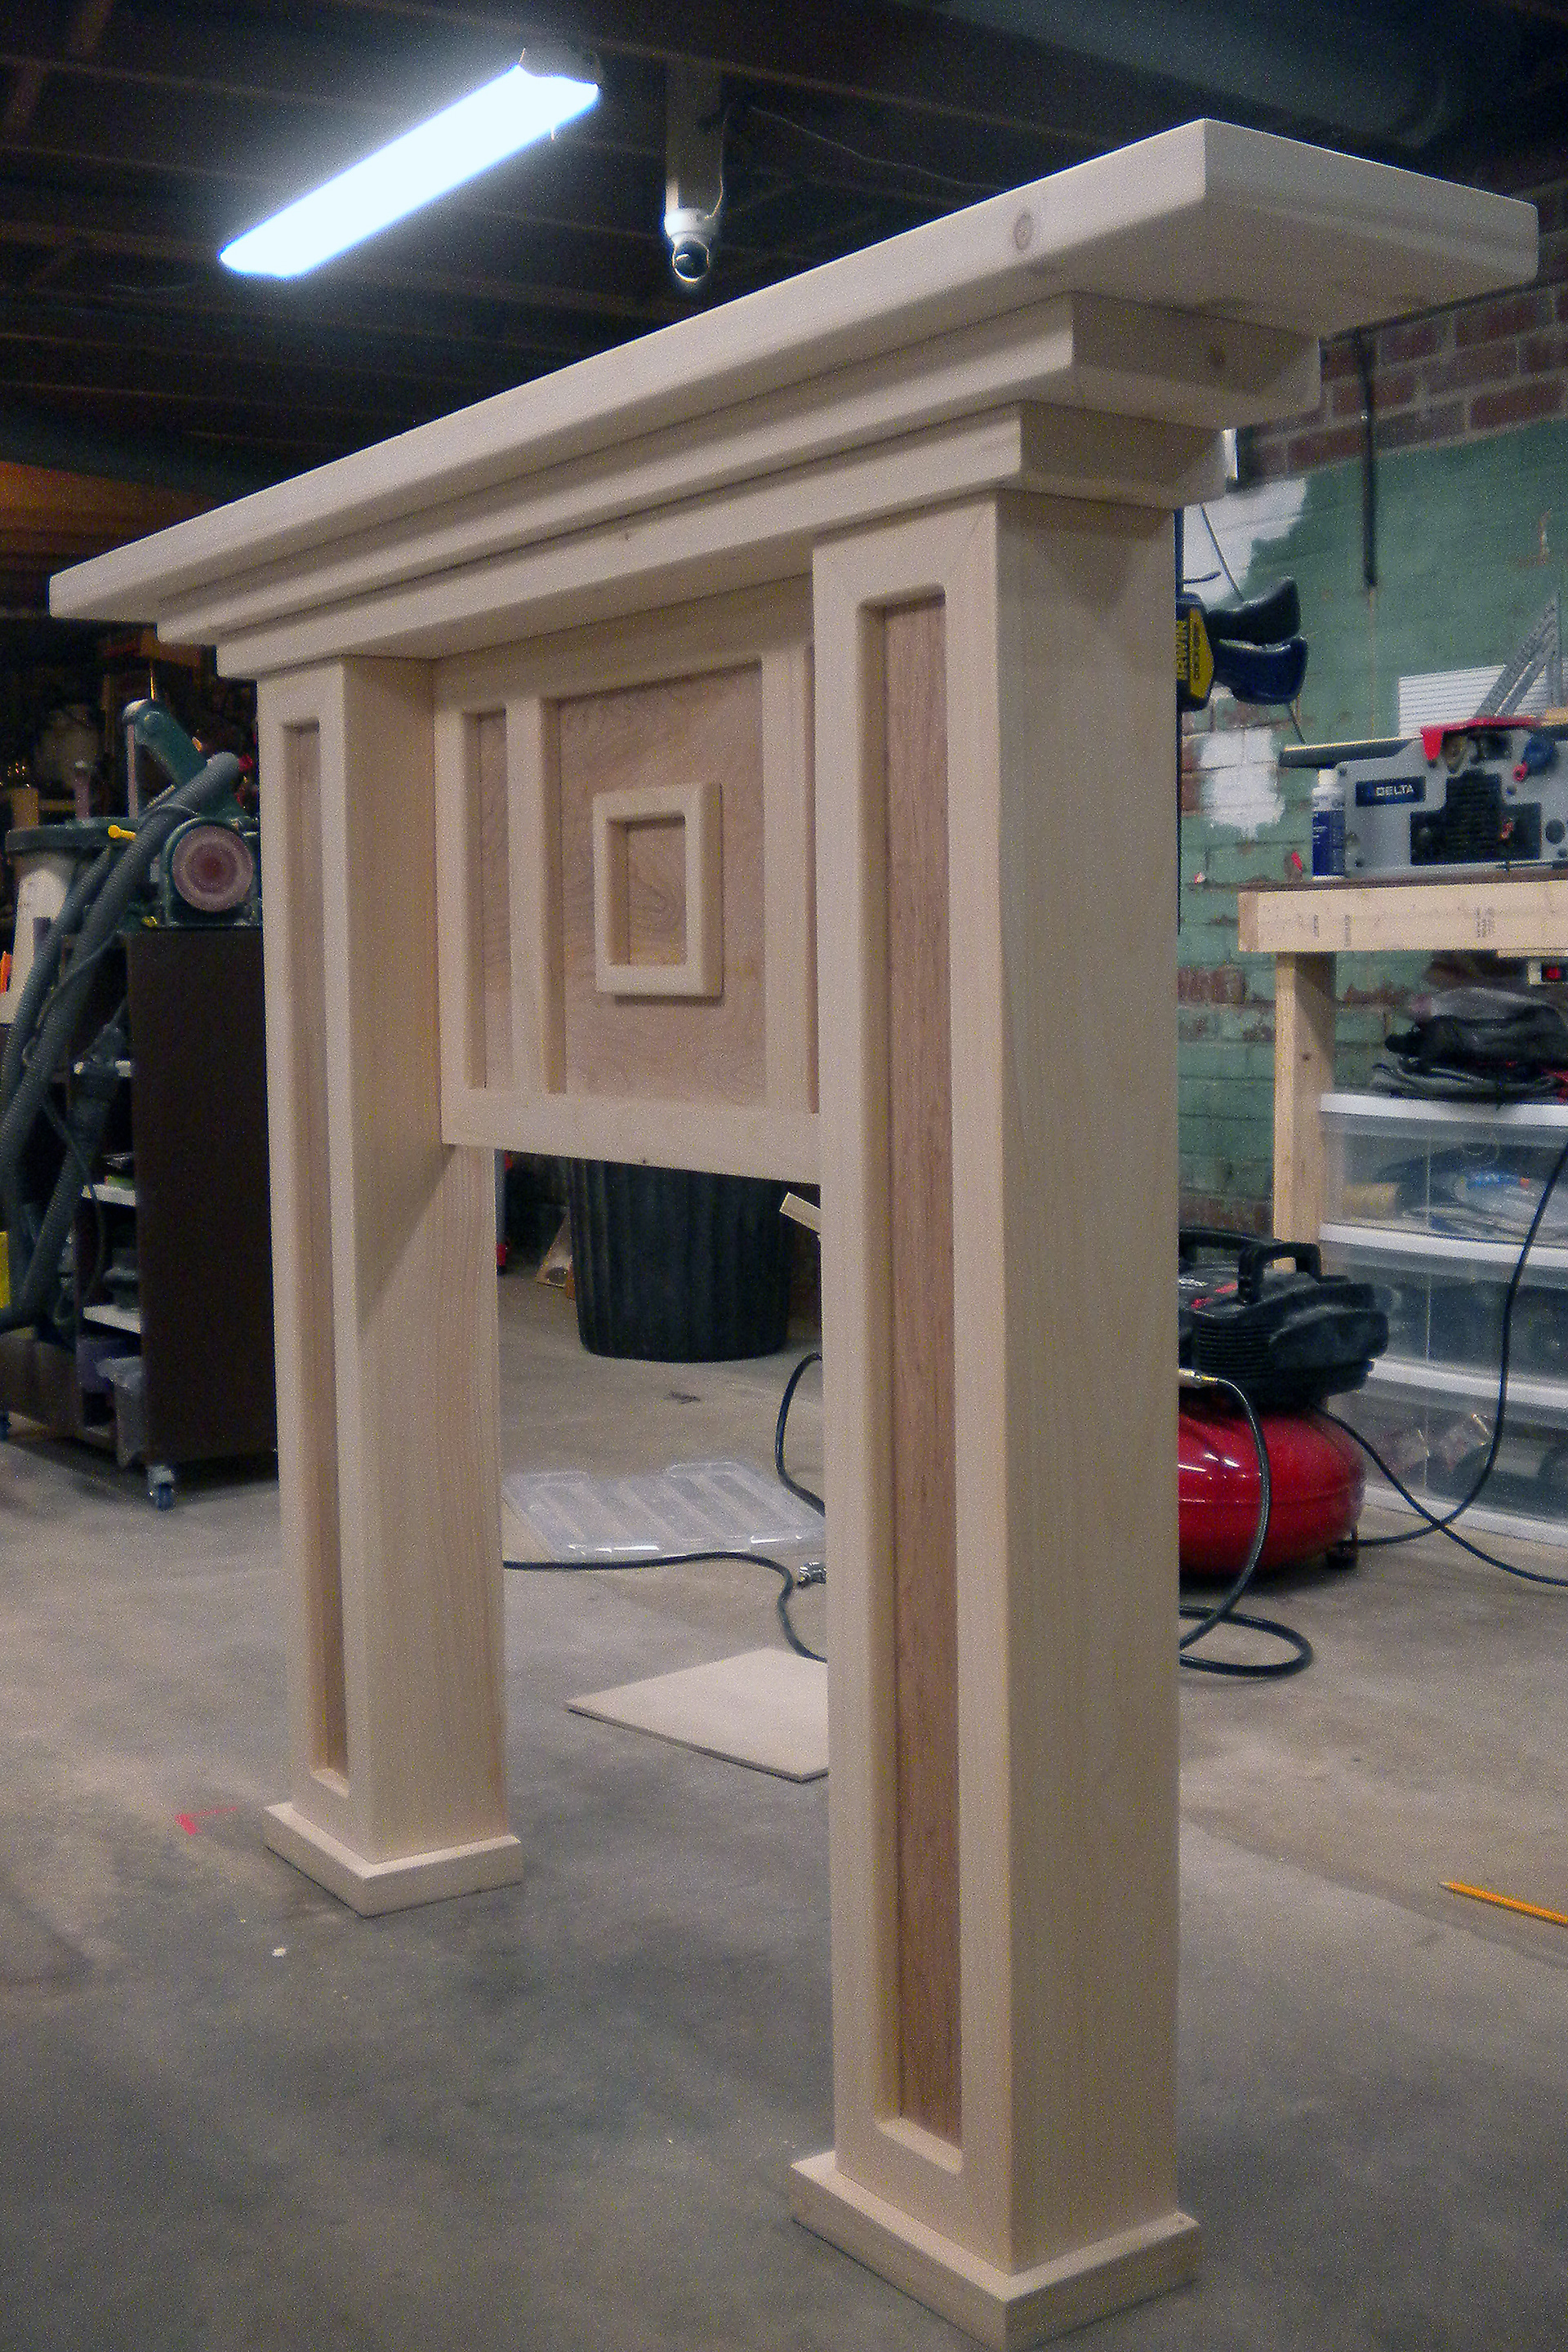
Specifically, this mantel:
Specifically, this mantel:

I've built a few of these mantels over the years, and they are intended to be used with an electric fireplace insert (such as this one). Mantels for use with real 'flame' fireplaces (such as a wood or gas burning fireplaces) are different from this kind of design. The wooden sections on this mantel stick out too far to use in front of an existing brick fireplace opening. The rising heat would be too much for it, and if you were foolish enough to try, you'd likely set it on fire and have a nasty problem on your hands! We'll stick to electric fireplace inserts only.
In fact, the modus behind this project was to be able to add a fireplace into a house that didn't have one. Many electric 'wood burning stove' type fireplaces have a fake 'realistic' fire effect, and putting one inside a mantel is a nice touch. (And you get to use the mantel during the holidays to hang stockings!) Here is another version of a fireplace mantel with the added electric insert:

Besides the nice flame effect, the electric fireplaces typically act as space heaters too - perfect for chilly fall evening relaxing on the sofa while darning socks... Or whatever.
Design:
Everyone has their own style, constraints, skill set, etc... This project guide is intended, in a general sense, to give people ideas, and make them think about similar things they could design/build.
There are countless examples of fireplace mantels online (and, to a lesser extent, in real life). What you want your fireplace to look like is entirely up to you, but it is always helpful to look around and find examples of what you like. You can use those examples as a basis for your own designs. I went through a ton of ideas before building anything - and my designs are always changing based on any new examples I might find. For the mantel in this example, I decided on a fairly traditional approach; two legs with a wide, deep top, and panel in the center. I also added some enameled tile into the design.
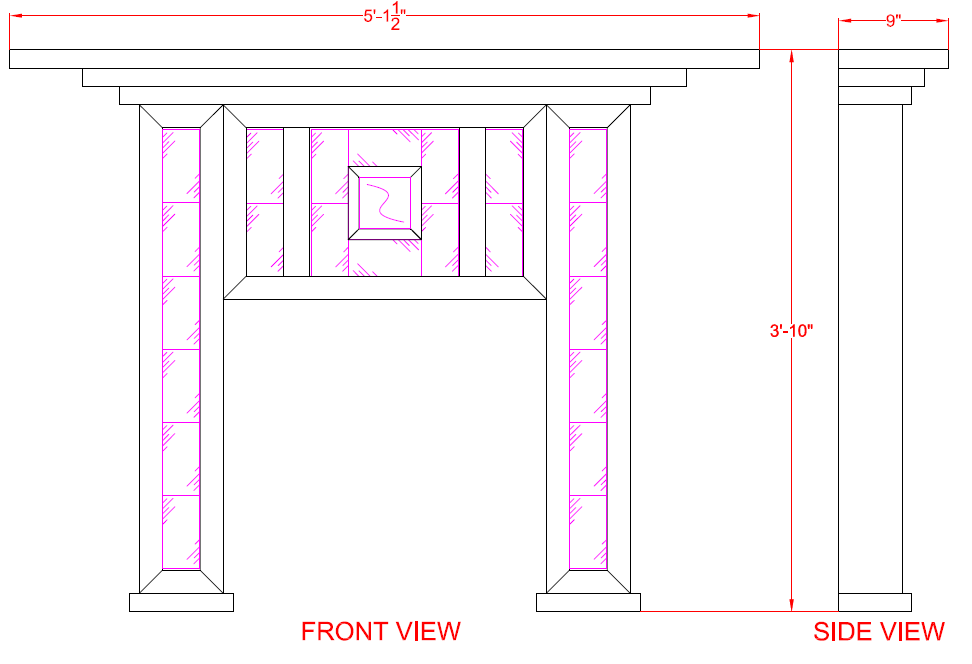
If you're building a fireplace mantel to fit inside a specific space - first you have to know for sure that the finished product will, in fact, fit. Not only physical fit, but also how the mantel will look when considered against the other furnishings in the room. (For example, how will your fireplace mantel look next to your antique Louis XIV chair?) Overall dimensions can always be adjusted once you start planning the construction stage, but it helps to have a specific idea of what you want the final dimensions to be. My example mantel has overall dimensions of 5'-1.5" long by 9" deep by 3'-10" tall:
Next, if you're intending to put an electric fireplace insert into the mantel, then you need to pick one out and use the dimensions of that insert to determine how large the inside opening of your mantel has to be. It is always a good idea to add a little extra to those dimensions - thereby giving yourself some 'wiggle room'. My example mantel has an opening of 2'-1" wide by 2'-1.5" tall:
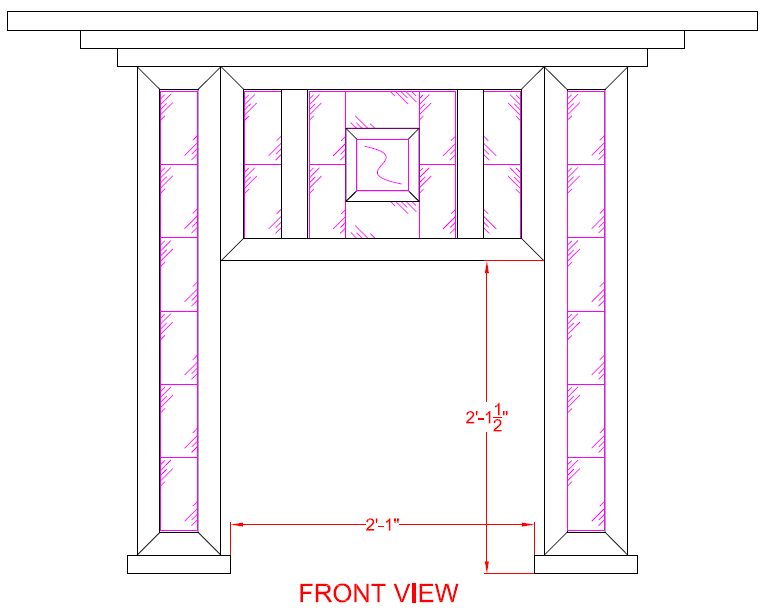
This is a little bit larger then the 2' by 2' square opening I need ('wiggle room') for many typical commercial 'wood burning stove' type electric fireplace inserts. I built this mantel to sell and I wanted the opening size to be fairly generic.
Now that we have the size details of the mantel figured out, the next step is to draw up some kind of plan. I'm not going to get too specific here - I could write endlessly about scale rulers, computer aided drafting, blue line paper, orthographic drawing, etc. But that would be going beyond the spirit of this blog entry. I'm trying to keep things simple (KISS method) for now. But I will recommend a couple of things for anyone who wants to try some computer aided design and drafting: Google SketchUp is a nice, free, 3D modeling program (and a great way for the novice to start). My second recommendation is AutoCAD - unfortunately not nearly as simple to start using as SketchUp (or as free) - but a very powerful program. AutoCAD is what I use, so I may be a wee bit biased. ;) If designing on the computer isn't for you - then don't be afraid to pick up a pencil and start sketching by hand. Just keep a close eye on your math and measurements - and don't forget to consider things from every side (good advice for those drawing on the computer, too!).
Ok, we have a plan, but before we can get to construction, we need to consider materials.
Materials:
I used wood to build my example mantel (with some enameled tile as a detail). The lumber you buy will have an impact on how you end up building your mantel, so it can be important to think about it when you're drawing up your design.
Now might be a good time to take a look at a previous post of mine (if you haven't already) for more information about lumber: Lumber and Timber and Wood, Oh My! It goes through some basics and should be helpful.
The size of the material can be important because it dictates how thick the sections of your work will be. For example, I used 2" material (actually 1.5", right? That would make sense if you read the other post) for the top sections of my mantel. Since the wood was a good thickness to begin with, I just designed the mantel lid pieces to take advantage of that thickness. The walls of the example mantel's 'legs' were built using 1" thick material (really 3/4") because I didn't need the extra thickness for a visual - I only needed enough material to hold everything together.
The areas on the example mantel where I attached the tile were backed with a thin material - 1/4" Lauan plywood. Plywood (a manufactured wood) is a 'sheet' material (as opposed to 'stick' material), and typically comes in sheets of 4' by 8' by whatever thickness you want (1/4" in this example). Sometimes you can buy smaller pieces (for example 2' x 4'), because not everyone has a truck. (The better stores or lumber yards will sometimes cut up a big sheet for you to help fit it into your vehicle).
The tile I used was simple subway wall tile, painted and glazed with varnish (polyurethane).
Construction:
We're getting to the point where taking a look at my whole drawing (drafting) might be helpful. Keep in mind these drawings were done by me, for me - so I don't intend a third party to be able to jump right in a build a copy (not without some head scratching, at least), but I do try to be a thorough as possible. I'll do multiple versions as I build something, thus ensuring I always have current information (I might want to build another someday - or share it on a blog...). ;)
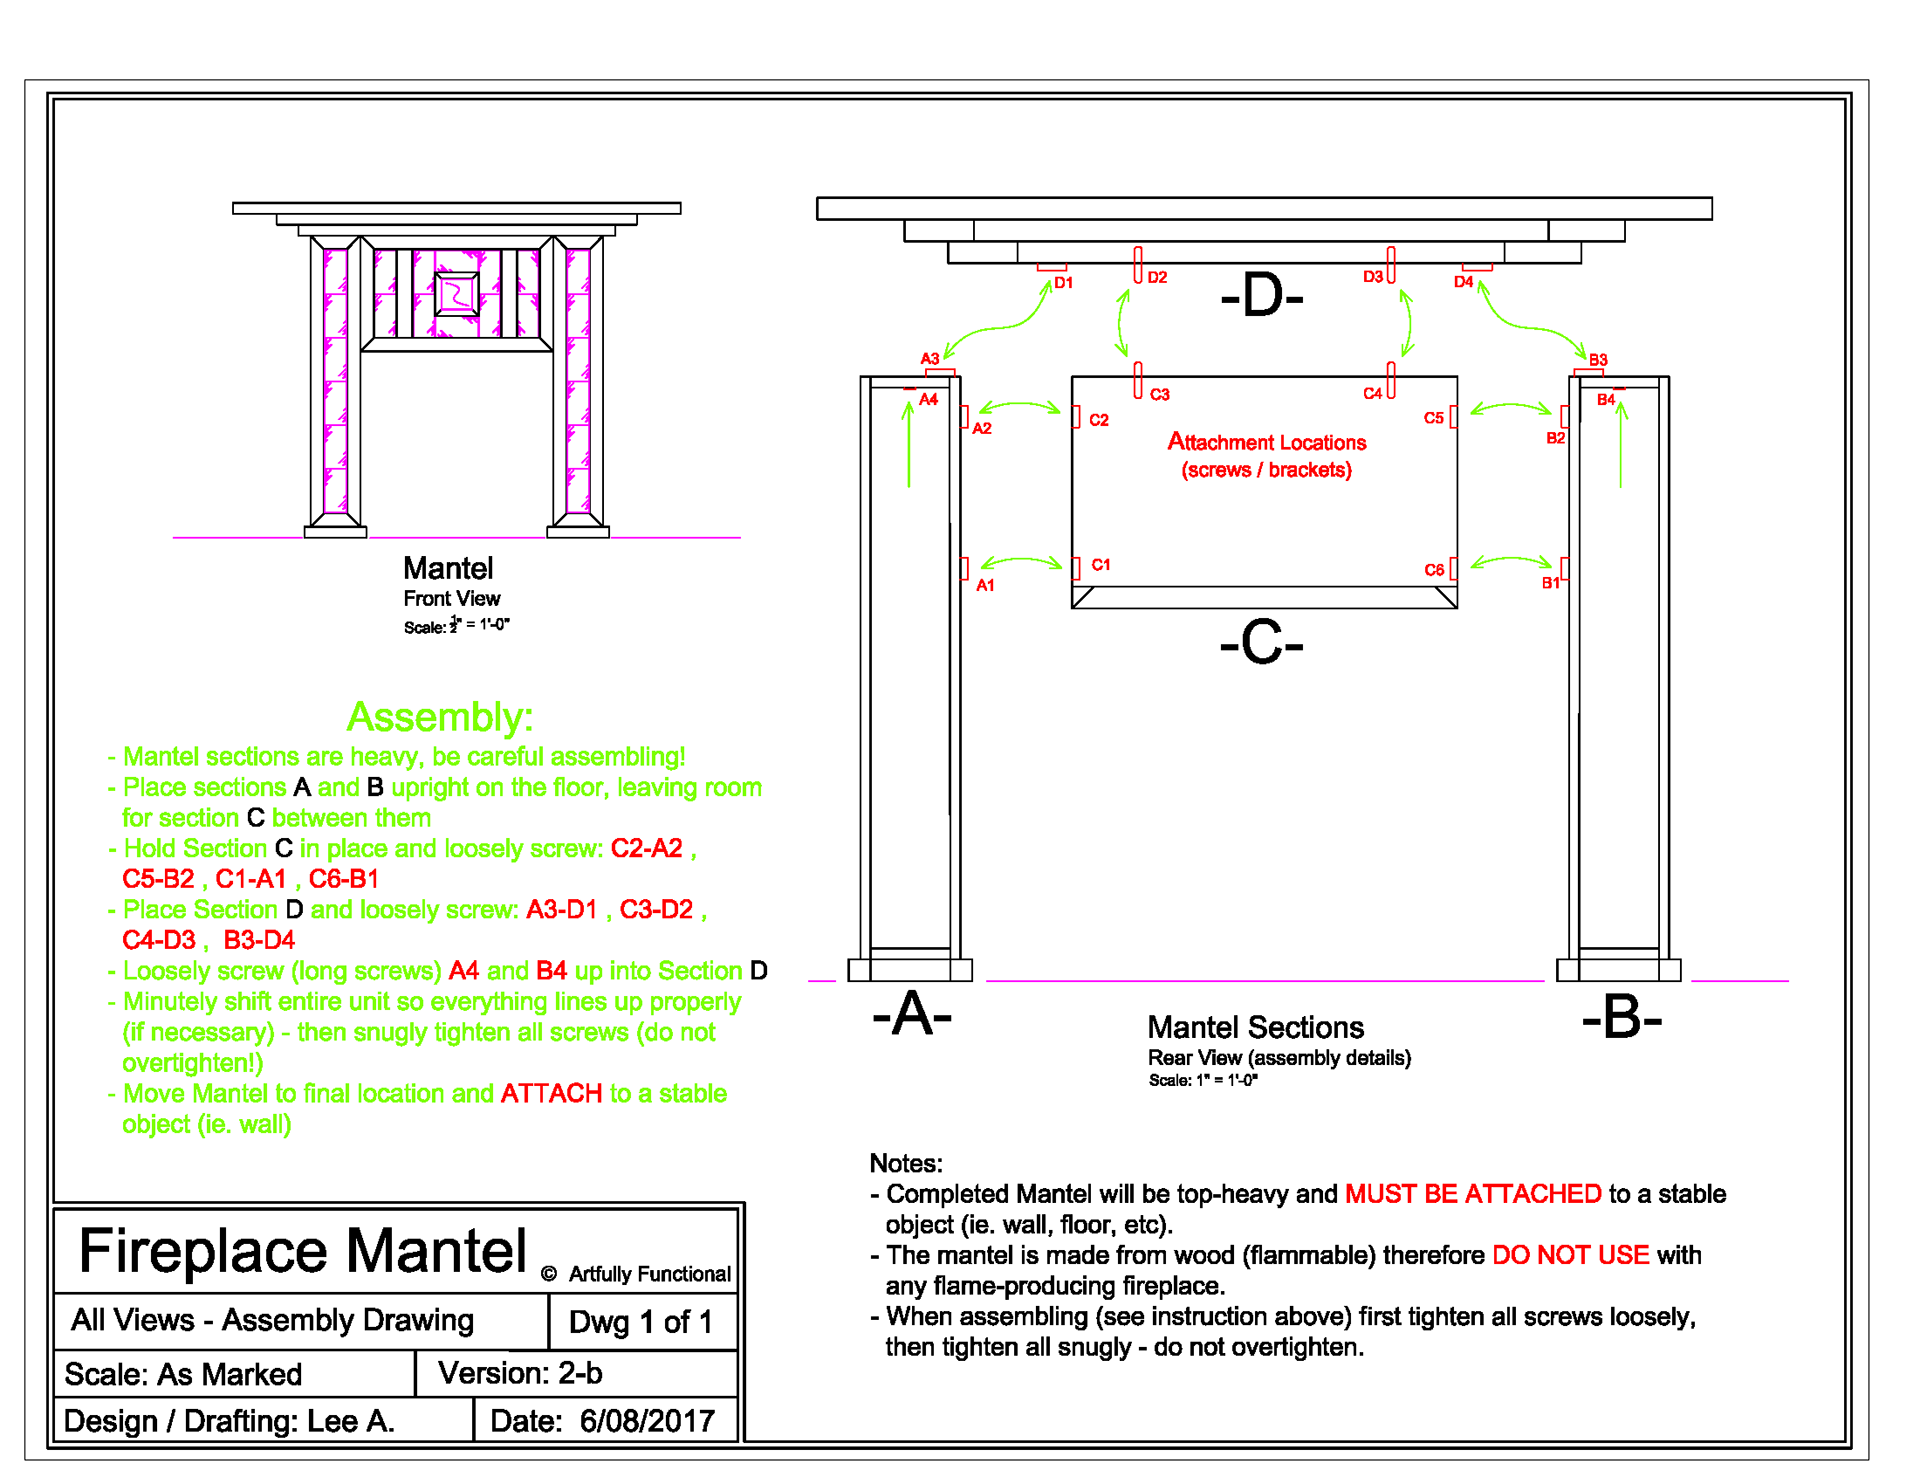
This was a relatively simple project - requiring only one main drawing (I typically draw on 12" x 18" paper - the largest my printer can print):

As a courtesy to the future buyer of this mantel (fingers crossed), I did an assembly drawing which nicely shows how I broke up the unit into a few different parts for easier transport. It might be useful as an aide for this discussion:
Once we have our design and materials - it's time to start putting things together.
Every crafts-person I've met has a slightly different approach to attaching sections of lumber together. There are countless types and classifications of fasteners (*sigh* yet another separate post I should write...) including: nails, staples, glue, screws, joinery, biscuits, etc. They all have their pros and cons. Personally, I'm a huge fan of modern wood glues. Often, glue is laid down along a joint, the joint is clamped together, and then some other kind of fastener is applied (i.e., screw, staple, etc.). Depending on the project, I'll often forgo the metal fastener entirely and focus on the wood glue as the only attachment method. This avoids the sometimes ugly hardware holes/marks from nails, screws, staples, etc. Modern wood glue (when properly applied and clamped) typically dries harder than the wood around it - making for a very strong bond (the wood will break before the glue). Here is the top of my mantel (the 2" material) being glued and clamped together with C-clamps:
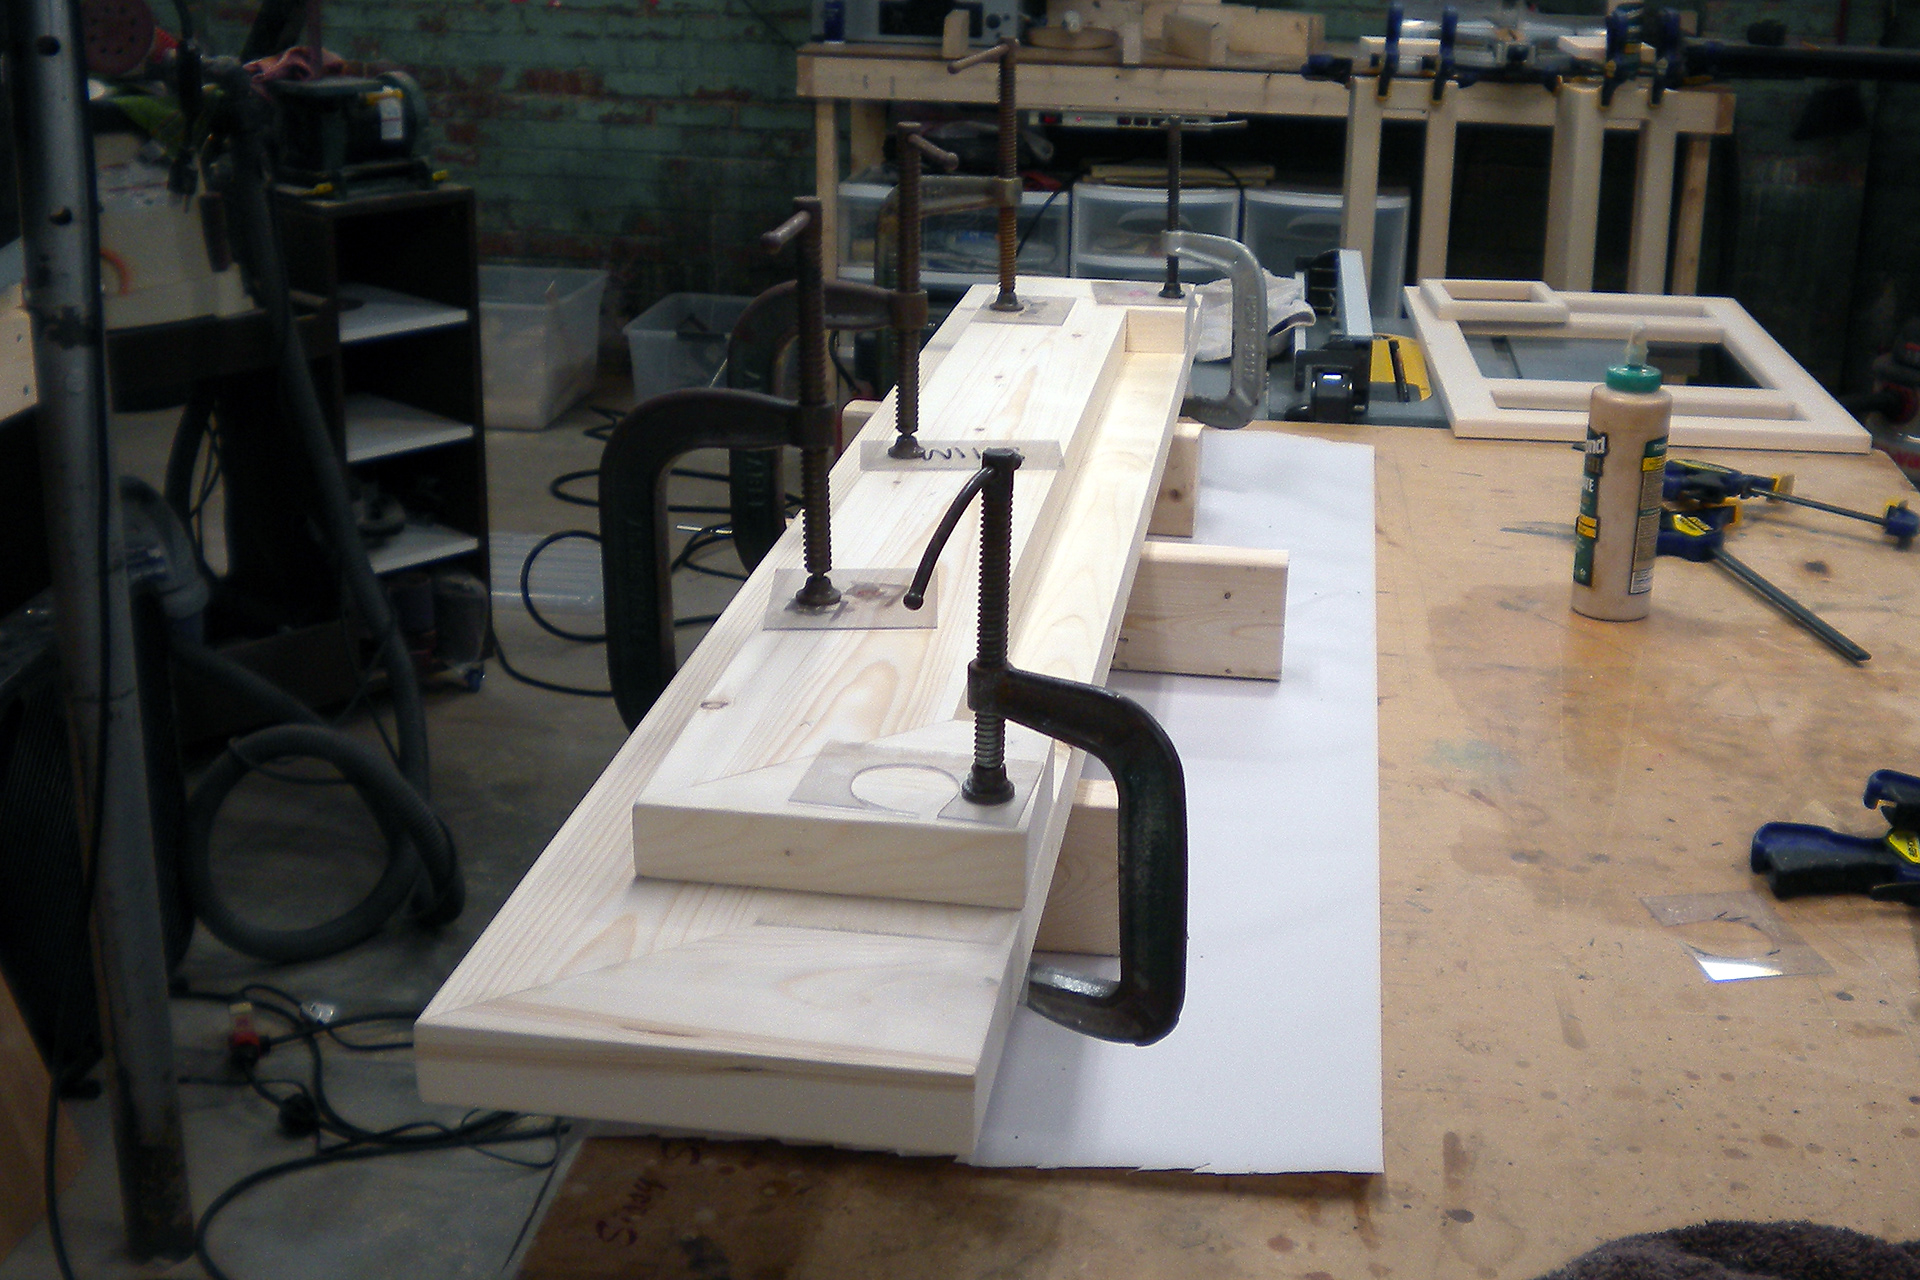
Different kind of clamps have different abilities. The C-clamps in this image are a bit old-school, but can exert a lot of force. There are many other kinds of clamps - and I'll talk about them as they come up.
The glue brand I prefer for most any woodworking project is Titebond. Glue is another one of those huge topics - and the science and history behind it is pretty interesting (if you happen to like that kind of thing... which I do).
While glue is never a bad idea, there are times when metal fasteners should be used - particularly when strength, weight, or exposure is an issue. For example, I built a wooden bed frame once - but I wasn't silly enough to try and glue the headboard and footboard to the box spring rails (I used lag bolts - people are heavy). This fireplace mantel is heavy - but the force is all straight down the legs (vertical) - so I wasn't too concerned about using anything but glue to hold the individual sections together. Tying all those sections to each other, however, required metal brackets and screws - since the mantel had to break down into sections for easy storage and transport:
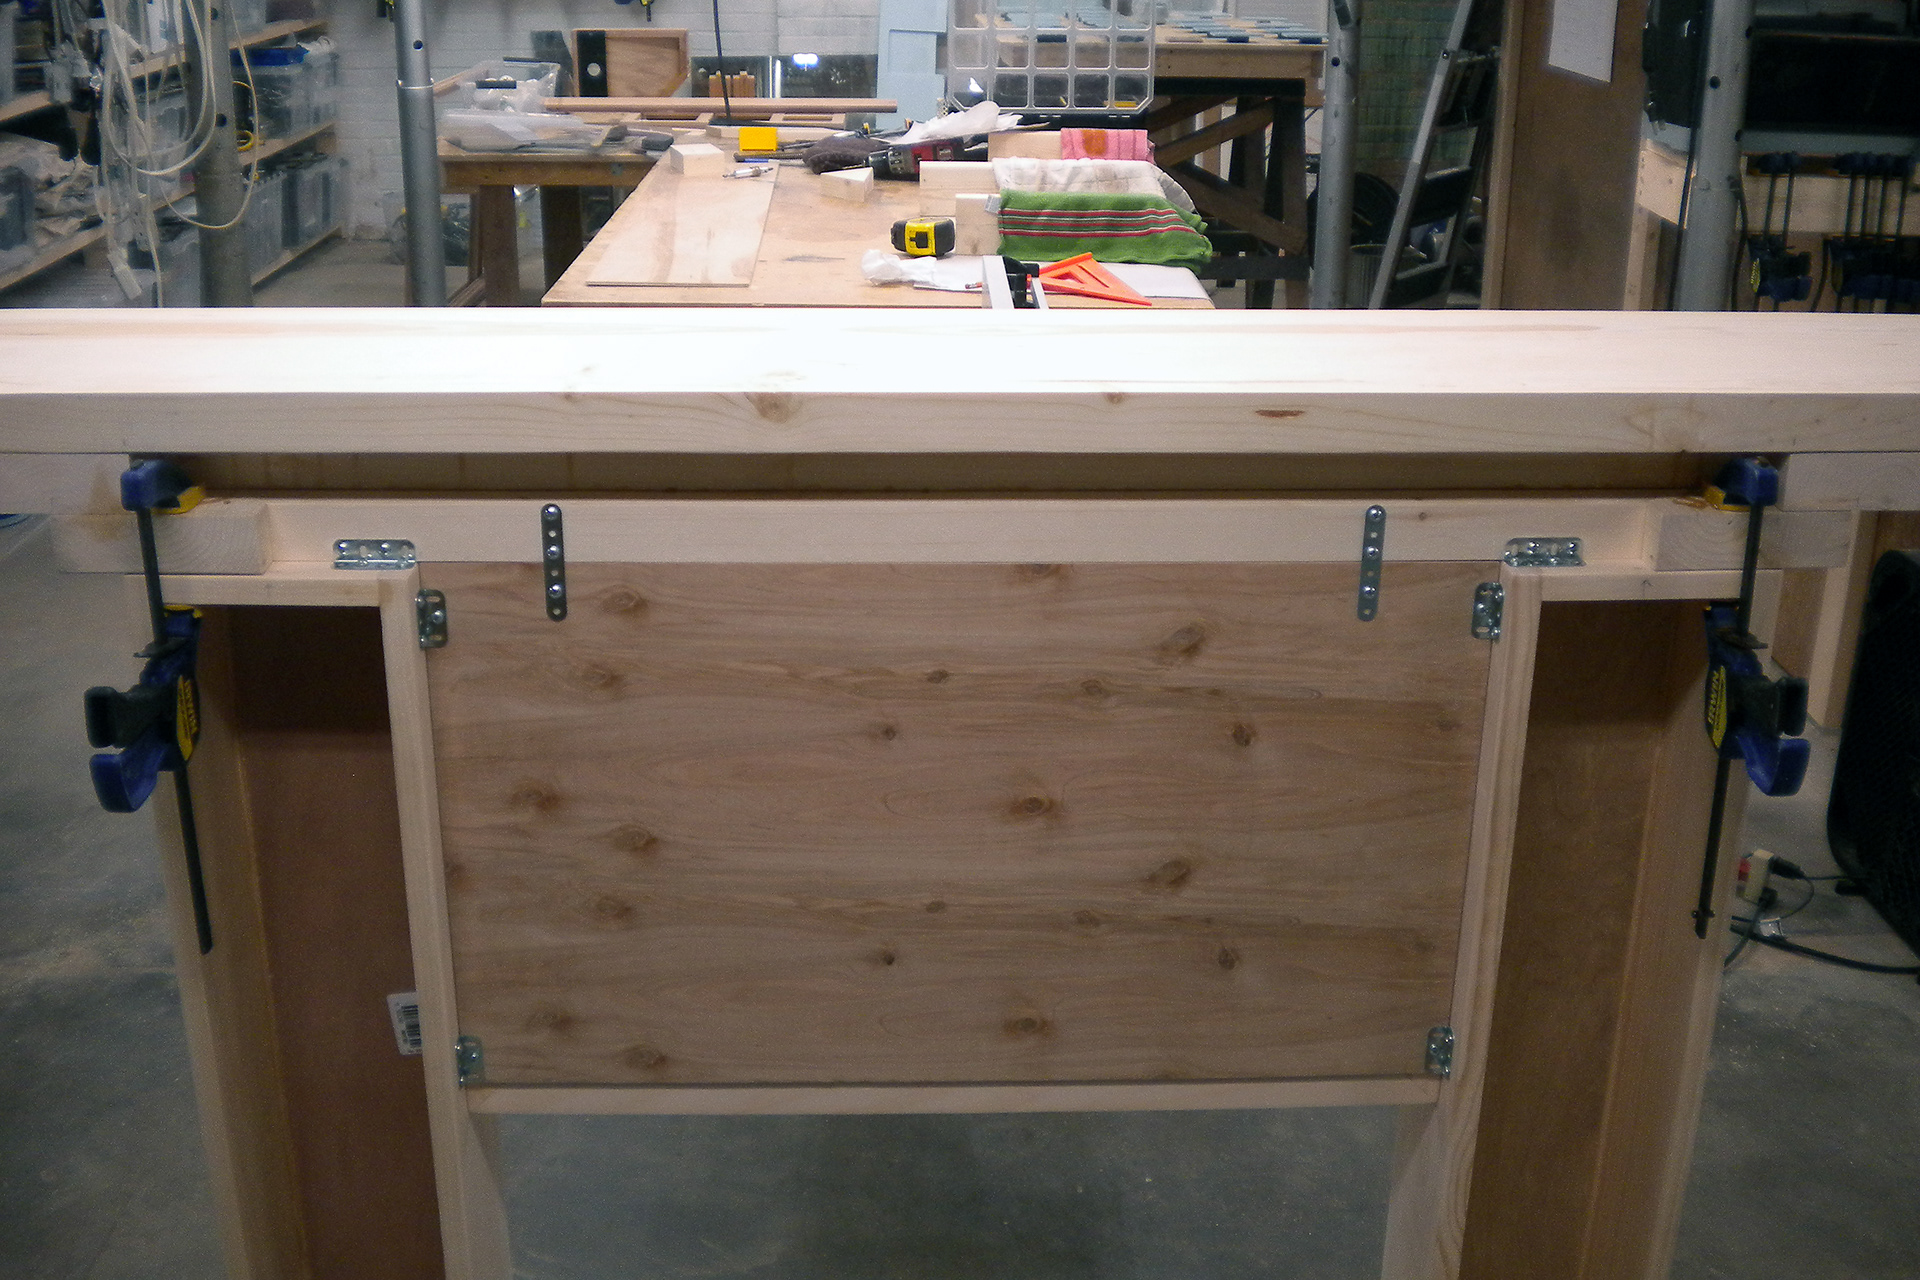
As the above photos shows, we're just about at the 'finishing' stage of the project. As mentioned earlier, now might be another good time to take a look at a previous post of mine (if you haven't already) for more information about lumber: Lumber and Timber and Wood, Oh My! It discusses finishing materials in slightly more depth. For this project, I chose to varnish the mantel with semi-gloss polyurethane (3-4 coats). This darkened the wood slightly and added a nice bit of glossiness to the mantel. It also had the advantage of adding a layer of protection to the soft pine. My stain and varnish brand of choice is Minwax. And much like glues, the science and history behind finishing agents is also quite intriguing.
The painted tile was glued onto the fireplace mantel sections after the varnish had dried, and that is just about it for this project:

As I mentioned earlier, this project is intended to be a starting place for your own designs - not necessarily an exact instruction set for building a duplicate wooden fireplace mantel.
Feel free to peruse my plans, however - and hopefully they will spark an idea or two! :)
-Lia
Contact Me
My Writings (Transgender Woodworker content)
Artfully Functional (my studio)
LiaZero.com (all my online content)
My Writings (Transgender Woodworker content)
Artfully Functional (my studio)
LiaZero.com (all my online content)