

Taking decent photos of your work (art, craft, furniture, etc.) is an important skill. The following guide is advice for others like me - the generalists, the amateurs, and the craftspeople who just want to learn a few tips and tricks for getting better photos of their work. After all, we're an extremely visual society - Instagram, Facebook, Pinterest, websites, etc. - so you've got to make your work look good if you want to show it off and get other people to pay attention to it!
While I usually prefer to be in front of the camera, I'm pretty decent at faking my way around the back side of it. I'm old enough (unfortunately) to remember learning how to shoot on film - followed by my first extremely low-resolution digital cameras.
I've always enjoyed taking photos, but more for the sake of the subject than the technique. If I was at a job interview and the interviewer asked me to explain what aperture was and how it related to ISO speed, I could come up with an answer - but I wouldn't get the job. The job would go to the person interviewing after me (the woman with a degree in photographic arts and more technical knowledge in her little finger than in my entire body). Her photos would be much better than mine, too.
I'm not concerned by this because when it comes to photography, I'm a generalist. I know enough to get by - and enough to know what I don't understand. I also know what I've learned from a long time of playing with cameras and taking lots and lots of photos - both for fun and for my technical theater background.
Therefore, and as I wrote above, this guide is advice for others like me - the generalists, the amateurs, the craftspeople who just want to learn a few tips and tricks for getting better photos of their work.
To that end, I'm going to step through the basics of how I set up my photo area and how I take photos of my pieces. Some of it might seem like common sense, but some might be interesting enough to incorporate into your own routines.
Let's start by talking about what we need:
Equipment:
There is (figuratively speaking) an unending list of camera brands, styles, accessories, types, add-ons, and more. Just thinking about all of it makes me a little, well, numb... You’ll understand what I mean if you’ve ever had to listen to knowledgeable photographers debate the minutiae of some obscure piece(s) of photographic equipment. It’s enough to make you want to do harm to said obscure equipment. But it’s not their fault -- we just don’t care that much. (‘We’ here refers to everyone who isn’t a knowledgeable photographer.)
I really should have put a disclaimer at the top of this post (well, better late than never): Real photographers should not read this post – it might insult your intelligence and waste your time! :-/
Now that we have that out of the way – let’s have a frank, SHORT discussion of photographic equipment:
You’ll need a camera of some kind (heh).
SLR (film), DSLR (digital), cell phone, webcam, whatever. Generally, the thinking is the more expensive it is, the ‘better’ photos it can take. This can be misleading, however, as many people take photos solely for posting online – where you can get away with ‘less good’ (where’s my thesaurus?) photos than if you were having the photos, say, physically printed onto room-sized banners.
Don’t have a fancy Nikon or Cannon? Your cell phone camera (assuming it’s reasonably modern) is more than capable of taking decent shots of your work. You won’t get the same kind of manual control or resolution that pricy DSLR cameras can get – but it’s a lot better than nothing.
Other than a camera – you’ll need some kind of tripod or camera stand (they make nifty holders for attaching cell phones to tripods). You can find a decent tripod for not too much expense – and it's totally worth it (more about why later).
You’ll need lighting of some kind (more about this when we discuss the Environment). And maybe a flash (if you’re rocking the SLR or DSLR).
Lastly, a wireless remote clicker. You can find these for DSLRs or cell phones. These cheap, small devices allow you to take photos without touching the camera (we’ll discuss why this is important later).
Questions? Ask Google. No? Let’s move on.
Environment:
Let's talk about where you're going to take your photos.
Eventually, you'll need a subject (or object) for your photography - such as a cool new art piece, or exciting furniture creation, maybe your cat, or a weird family member - whatever you want photos of. It doesn't really matter yet. What matters is the general size of the thing(s) you're taking photos of.
If you're trying, like me, to set up a dedicated 'photo area,' then you have to consider how much room you want to give over to it. I was lucky enough to have a section of my basement shop I could reserve for this. I had built a wall in the middle of my basement separating my workshop from the HVAC equipment (to avoid dust issues and furnace setting-on-fire issues), and the back side of that wall was eventually turned into my photo area.
Obviously, you can take photos anywhere - but you'll have more control over lighting and clutter if you pick a spot and do a little work to make it a nice area.
Once you've picked out an appropriately sized space - you need to consider two main factors: lighting and background.
Let's talk about background first.
Unless you're planning to digitally crop out everything in your photo except for your subject, you need to consider what else is going to be in the frame. Assuming you've cleaned the clutter out of your area, this mostly means the background. Walls work well for this - preferably neutral-colored walls without too much distracting detail. I used bare plywood for a while - before moving up to hanging fabric and finally to flat white painted drywall. The bare plywood made my furniture creations look like they were in some kind of bunker (not what I was going for). The fabric looked better, but it was just recycled muslin - so not the cleanest. The white-painted drywall looks pretty good so far. You could purposely pick a certain type of background to add a certain 'feel' to photos of your pieces - but ultimately, we're concerned with the best view of the piece itself. To sum up, a neutral, clutter-free background works best.
Although, there is something to be said for taking some photos of your work in a 'natural' setting. For example, if you're taking a photo of a piece of furniture, you might want to have a couple of photos with the furniture in a realistic setting (near other furniture, in a room, or stuff on top of it) to let people see what your piece might look like mixed in with other decor. However, for the sake of my discussion, I'll focus on the 'product photographer' ideal (i.e., solid color background, no clutter). And as we move into discussing lighting - we should make sure the photo area background isn't something super glossy (matte paint is our friend).
Lighting is tricky. I could write an entire post about lighting your photo area - but I'm just going to talk about what works for me. As mentioned above - we're talking about product photography - which is pretty different from portrait photography (something to keep in mind).
I like the three-light approach:
1) Strong light from a front side
2) Less strong light from the other front side
3) Top light slightly behind your subject - focused on the subject
2) Less strong light from the other front side
3) Top light slightly behind your subject - focused on the subject
I made a top-down graphic - because, hey, why not?:

I've had good luck with this approach - it gives good light to both sides as well as the top - with some definition offered by the stronger light coming from one of the front sides. The window offers the potential for using some natural side light - but I like being able to take consistent photos without worrying about the light (or lack thereof) outside.
I spent some time experimenting with different light types and mountings. Incandescent lamps tend to be on the red / warm / golden side - while CFL (compact fluorescent) lamps can be made in a variety of color temperatures (higher is cooler / bluer / daylight). I initially had some luck using reflector-style work light mounts with high-color temperature CFLs in them. I liked the light color well enough - but using a number of point light sources gave me issues with reflections and inconsistent light intensity.
Finally, I advanced to using LED tube-style lights for all the lighting positions. These lights were inexpensive, high color temperature, and easy to hang / position exactly where I wanted them. I discovered good front-light coverage by hanging these LED tubs in a slightly unusual manner. This can be seen in this photo of my entire area - showing the three light positions currently being used (matching the layout drawing above):

Side note - this lighting approach is not the best for taking people photos (as it tends to flatten out features):

I look OK - but my features are flat and not very exciting.
Just for fun, here is a self-portrait I took by simply manipulating my aforementioned 3-light approach (hint - I turned off all the lights except for one front side light):

I look much more defined and interesting (if a bit brooding).
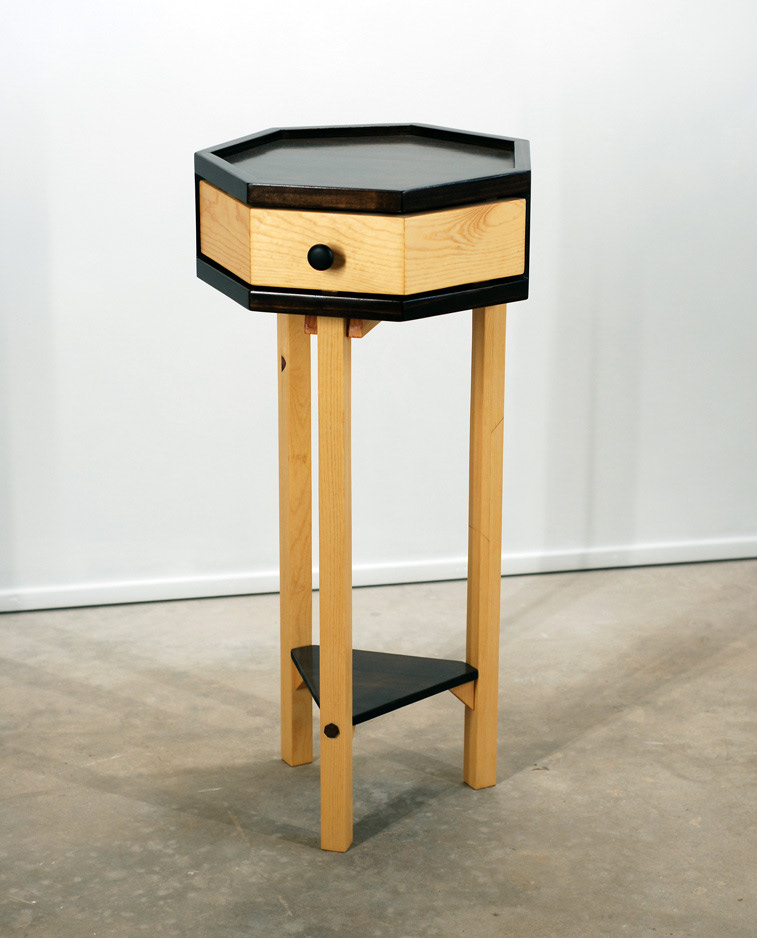
And yes, this can work for taking photos of items, too. Especially if you want to inject a bit of emotion or mystery into your product photography:
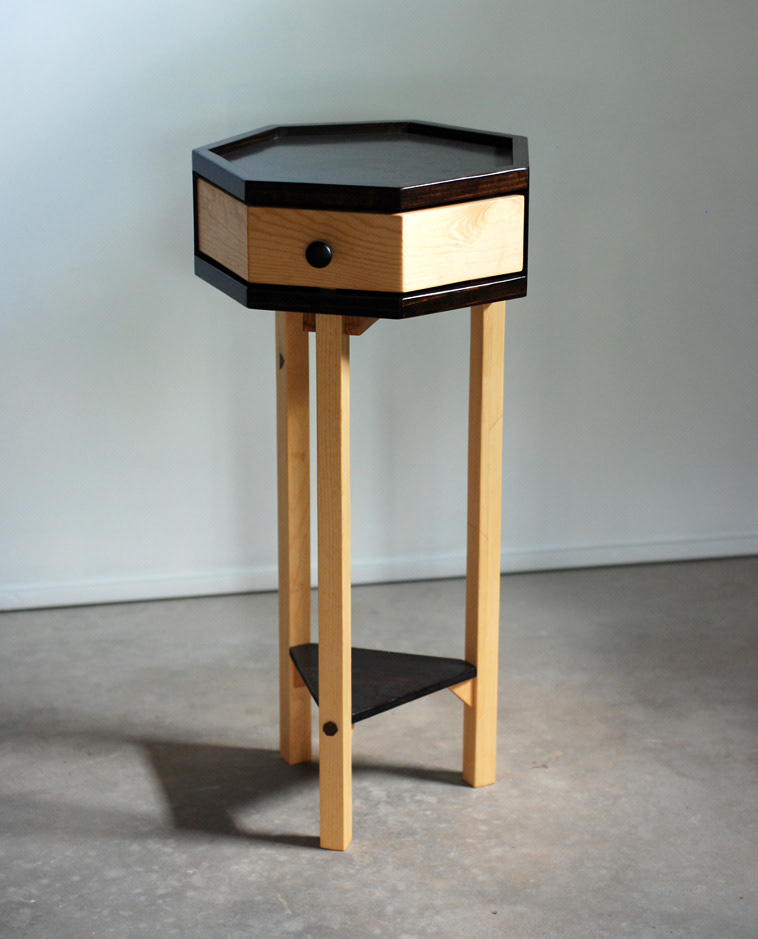
However, working with more light (like the 3-light approach above) will give you brighter, better-defined, easier-to-post-process images:
Experimenting with your lighting will help you discover what works best for your particular subject!
I'll touch on post-processing later on - but first, we have to take the photos
Taking the Photo:
Lights, camera, action!
Now we're ready to take the actual photos. We have a clean, well-lit area with our object(s) ready to go (product, art, craft, etc). We also have our camera on a tripod and have a clicker we can use to snap the shutter:

We have to physically interact with the camera and tripod to get the framing just right - as well as the focus and other camera-specific settings - but actually taking the photo should be hands-off (hence the wireless remote 'clicker' we discussed earlier).
"Why can't I just push the shutter button on the camera manually?" you ask. Also, "Why use a tripod at all? I can just hold the camera, right?"
The answers to such questions are: VIBRATION, VIBRATION, and NO... because of VIBRATION.
Unless you spend your days practicing to be one of those street performers who pretends to be a statue - not moving a muscle for long stretches at a time - you will have to worry about unwanted movement (or vibration) affecting the camera anytime you're touching it. (And, quite frankly, even if you are one of those performers - just make your life easier and use a tripod and a clicker.) There is nothing worse than taking a bunch of photos only to review them later and discover focus & blur issues.
A caveat: Most cell phone cameras and pricey DSLR VR (vibration resistant) lenses have features designed to minimize this issue - but it doesn't take much effort to use a tripod and clicker - and then you won't have to worry!
You still have to worry about focus, though. Thankfully, all modern cameras are pretty good at autofocusing (so long as you make sure they are autofocusing on the correct area).
Yes, I know I glazed over 'camera-specific settings' earlier - that wasn't a mistake. You'll have to adjust these settings to their best effect based on the specific camera you're using. Thankfully, most modern cameras have pretty decent 'auto' settings - so that's a good place to start. Even professional photographers don't adjust every single setting every time they want to take a photo (let the camera do some of the work).
Now go take lots and lots of photos of your work! The more you take, the larger the pool of potential images will be for you to choose from when it comes time for post-processing.
Post-Processing:
Being able to easily edit images is one of the best parts of shooting with a digital camera. The elements of digital image editing can, however, get complicated pretty quickly: image histograms, color balance, white balance, sharpness, file formats, color spaces, magic spells, secret portals to other lands, and so on.
I've kept this post focused on set-up and taking the actual photos. Therefore, I'll save the post-processing discussion for 'part 2' (something to look forward to). That being said, I do have a few initial pieces of advice:
1) Almost every photograph will benefit from 'some' post-processing.
2) Less is more. Don't over-process (we can tell).
2) Less is more. Don't over-process (we can tell).
Ultimately, what you want to do with your photos (website, print, social media) will help dictate how you post-process them.
To sum up - the biggest takeaways from all of this are:
- You don't need a big, expensive camera to get decent photos
- Take your photos in a clean, clutter-free area
- Pay attention to your lighting
- Use a wireless remote to snap the shutter
- Experiment with camera / light settings
- Take LOTS of photos
- Consider some post-processing
- If you want to learn more about photography there are lots and lots of helpful and informative websites and real-world resources to explore.
Hopefully, my advice will give you a few simple things to think about when you're next taking photos of your work!
-Lia
Contact Me
My Writings (Transgender Woodworker content)
Artfully Functional (my studio)
LiaZero.com (all my online content)
My Writings (Transgender Woodworker content)
Artfully Functional (my studio)
LiaZero.com (all my online content)